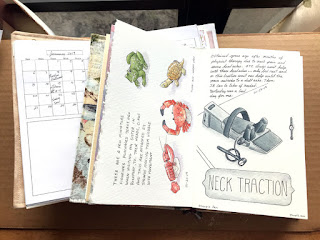
Showing posts with label Traveler's Refillable Notebook. Show all posts

Friday, March 20, 2020

Have You Considered Making Your Own Journals?

With everything going on and people staying home due to the Coronavirus, now might be a good time to try your hand at making your own journals. The major positive is having journals with paper you love whether it's one type and brand or a mixed journal of various type papers you enjoy using depending on the mediums you like to use.

Although a little time consuming (which might help with the down time at home), it's really not that difficult once you know where to look for instruction and what to do. Once you finish and you hold that journal in your hand, you'd be amazed by the pride and joy you feel knowing YOU created the book sketching and displaying your artwork.

The easiest of the home-made journals are probably the accordion style (similar to what's shown here) where you fold and cut a full sheet of watercolor paper and simply glue mat board either plain or covered in fancy paper to front and back.

Another easy type of home-made journal would be cutting full sheets of paper down to the size you wish to work on and having it spiral bound...either by purchasing equipment to bind your own or later having it done at a print shop or local office supply. I think the postal service or UPS might do it also for a fee but not sure on that. I have my own binding machine so my knowledge is limited to what's offered out there.

One of my favorites and easy to make would be the Traveler's or Midori style journal with paper cut to preferred size and using a thick piece of faux leather for a cover plus elastic bands to hold your paper in place. There are various ways to make the covers from simple leather/faux leather to sewn fabric covers or even hard casings (which I haven't tried yet).   My favorite are the fabric sewn covers I made a couple years ago for myself and as gifts for several people.

Not only were the journals fun to make but I so enjoyed making charms to hang for that little added interest.

For me, I love all of the above type journals but I have to say the most rewarding has been the hardbound fabric-covered, hand-sewn journals I've made. I have several posts I've made about the various hand-made journals but thought I'd write this one......an update summary of sorts with a pdf I've created that helps me remember what to do that others might find helpful.

This pdf is specific to creating 5 x 5 1/2" size journals. Except for how to cut full sheets for other sizes, the rest is basic information for any size you decide to go with. 

The first two pages of the document is a basic outline I created for myself laying out the steps followed by instructions and images.  Besides the tab at the top of my blog named "Bookbinding," there is  a link within the document to my post of the most helpful videos I found to create my journals.  Sea Lemon is wonderful and easy to follow.

Bookbinding 5x55 BooksCOMP 


So if you'd like to find something different to work on.........challenging but fun to do, consider trying your hand at making your own journals for sketching and painting.  

Tuesday, January 29, 2019

Loving My Fabric Fauxdori Traveler Journals

It's been months now since I made these journals and I'm loving them!!!  I have two active with one as a combination planner, art pages, and section with different papers (dot, graph, blank) for note taking.  The other is strictly for sketching, mixed with three different type papers - Strathmore 500 Imperial 140lb Cold Press, Stonehenge 90, and Stonehenge Aqua 140lb Cold Press.  In both I have pocket folders I made to carry smaller loose sketches (on scrap size paper), business cards, or loose notes.

I LOVE the freedom of removing pages when I want to sketch or paint flat.  Also makes it easier to scan.  Then there's the option and freedom of moving pages around in any order I might like.

I'm still undecided what I want to do with the finished pages.  Maybe down the road I might remove the sheets creating signatures and binding in a hand sewn hardbound book... or ... I might just keep making new fabric traveler journals and keep my full ones as I would any other type journal book.  The different patterns and colors of the covers look neat on shelves, along with the charms hanging.


Thursday, May 10, 2018

Folding and Cutting Paper for My Fabric Artist Journal / Traveler's Notebook

I thought I posted this but looking back, it doesn't appear I did.

My fabric journals are an odd size compared to how others might size theirs.  Definitely different than the standard size Traveler's Notebooks.  The paper folded is 5" wide by 8" high with the fabric cover measuring approximately 5.5" x 8.5" (closed).

Fabriano paper is my #1 choice to make these from so I needed to learn which direction the grain runs for best folding (so paper doesn't crack at the fold after a period of time opening and closing).

Although there might be a better layout, this is what I've been using to save on any waste after cutting.  I've also included the layout for Arches and Lanaguarelle since the grain direction runs differently from Fabriano (at least from the time of this post.........that could always change at some point with the manufacturers changing how they make their paper from time to time).


My Personal Fabric Artist's Journal / Traveler's Notebook Update

Thought I would share how I've set up my personal Fabric Artist's Journal / Traveler's Notebook created last month.   For now it's trial and error and I'll probably change or expand on this as I use it.

I'm taking a little from the Bullet Journal concept making mine into a planner/art journal to help me keep better organized with our sketching group.

**For more details / photos in the make-up of this particular AJ / TN.........follow this link:  http://sbwatercolors.blogspot.com/2018/04/my-second-fabric-fauxdori-artist.html

**To follow along with this journal concept project, sharing just how I made them, follow this link showing all related posts:

http://sbwatercolors.blogspot.com/search/label/Traveler%27s%20Refillable%20Notebook

 (I've shown the URL's in case anyone has trouble on a direct link)


**SIDE NOTE**

All of my page inserts are only folded strictly being held in place with the elastic bands.  I do plan to sew each insert group with the Saddle Stitch........although I might save the watercolor pages for AFTER I have finished sketching on them.  That way if I need to slide a page out to make it easier to sketch on, I can do so.


The large square beneath the calendar I'm leaving open for possibly a sketch for the month.  I haven't quite decided yet just how I'll use that area but that's the way I'm leaning.


Thursday, April 12, 2018

Today's Custom Fauxdori Cover

Today besides sketching, I also completed another fabric cover.  This one was special with my Leesburg "sister" picking out the material she liked.  We stopped off at JoAnn Fabrics after the sketch crawl and I came home and immediately got to work making it from start to finish.

Inside has an insert of regular paper (20 pages front and back) with a cover and a six-pocket folder.  I made an extra band for her to use to add her watercolor paper.  Inside I included a printout of how to cut her sheet of watercolor paper to fit this size cover.

I absolutely love the material and pattern on it and my dear friend loves the results.

Making these are addictive.......lol

Sunday, April 8, 2018

Yet Another FauxDori Cover / Step by Step

With each one, it's getting easier and easier to include operating my sewing machine and how to line up the Crop - A - Dile Big Bite hole punch/eyelet setter.

Out of all the YouTube videos I've watched, this one is the one I found to be my favorite and the one I'm basically following to create my own covers.

For the video version on how to make these, I found this one to be my favorite and the one I'm basically following with the exception of how she folds the finished cover.    Brandy Michelle Plans  She's very thorough in her presentation.  She also shows how to handle placement of center hole and eyelet for those who do not have a long reach punch / eyelet setter like I am using.

For those who are interested, please feel free to right click on images and "save image as" for your own reference.


Thursday, April 5, 2018

My Second Fabric Fauxdori Artist Travelers' Notebook

This Fauxdori turned out nicer than the first........although there are some things I learned with this one not to do next time.

This one includes an insert section with mixed lined, graph, and dot paper I printed off so I'm not having to carry an extra little notebook for notes and reminders when our group gets together.  The insert section has a piece of Bockingford watercolor paper as a cover only because that's all I had strong enough.  I went shopping last night and now have some nice patterned card stock I can use for future insert covers.

This one also has the pocket folder I made and shared in my last post.  I have several business cards tucked in one of the pockets that has contact information about our sketching group for interested people who check us out when we're out sketching.

And as you see from the photos, I'm now getting into adding charms and beads to hang just to dress the notebook/journal up a bit.

Notice my eyelets are lined up better than my first but could still be improved upon with lining.  I'm finally getting a "feel" for the crop a dile big bite gizmo.

I found cone bead caps that work perfectly for the bottom strands of the elastic bands made to hold everything in place.

**Now if I can just find a better way of attaching the closure loop without having to use a big knot to keep it from slipping out the center eyelet hole.


Folder Pocket Inserts for the Artist Fauxdori Travelers' Notebooks

This post is about folder inserts for the covers I'm making. 

First I tried using a letter size hanging file folder.....idea from Poketfulofvintage on the YouTube channel.  It turned out OK but not really wide enough to go with the size Fauxdoris I'm making.  But this can still be used and gives me an idea for narrower sized covers in the future.  Legal size would have worked better in my case but didn't have any.

I cut the bars off and then what was remaining resulted in this.

There are six pockets total.  Folded here are two pockets front and back......4 total

Than on the inside there are two additional pockets.

This measures:  4.5 x 8" closed


When I finished this one, I looked around to see what other material I might have to try another hoping for the 5 x 8" size I wanted.  I came across a pocket folder.  It ended up working out beautifully and they come in various colors as well.

What I like about using these for the pocket folders is that it gives me three different type of pockets instead of two using the file folder.

Measured Size:  5 x 8"

Two pockets both front and back (four total) looking like these and inside gives me two more deep pockets things cannot slide out of.


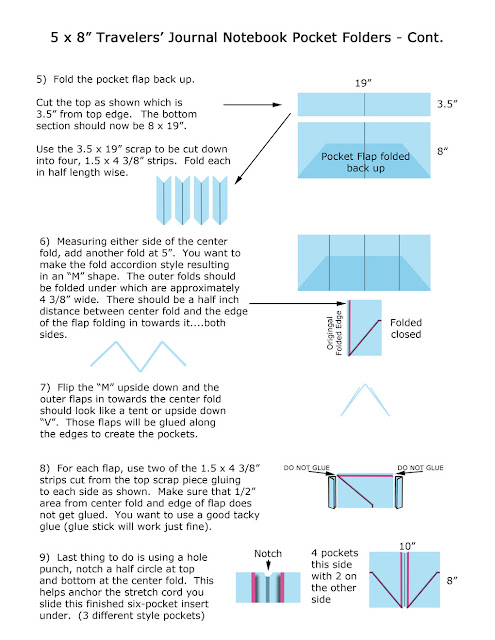
And here are two sheets showing how I went about making these:

SPECIAL NOTE:  After I posted this, I opened a new package of pocket folders and discovered the center is attached at the fold (unlike two older folders I had on hand which were not attached).  You still have to make the slit along the sides as mentioned below in Step 2; however, skip Steps 3 and 4.

Instead, work on through until you have finished the steps BEFORE gluing the pockets and cut the corners like this.  Use a small cutting mat and place it as you see in the photo.  Using a sharp blade (box cutter, xacto knife, etc.) cut off the corner.  Do this for both sides.


Wednesday, April 4, 2018

First Fabric Sewn Fauxdori Travelers' Notebook Cover

For days now I have been looking into an alternative method of making my own artist journals.  I've made accordion and hard bound hand sewn journals.  And I have made a couple leather Travelers' Notebooks.

My new venture is learning to sew and create hand sewn fabric covers along with adding various inserts and embellishments.

I've spent days and days viewing various videos on the subject getting a feel for the different methods people use to create their own.

The following is my very first sewn cover.  From this I've learned quite a bit:

1)  How to set up and use my sewing machine (this was a BIGGIE for me);
2)  What 72F Pellon is and how to use it plus the best way to cut so the fold looks better when cover is folded in half;
3)  How to size material and pellon for the dimensions I wanted my cover to be compared to the size cut watercolor  paper signature insert I wanted (a big thanks to Laure who helped me with that);
4)  How to trim seam allowance edges and corners to look right when material is turned right side out (after making a pocket);
5)  How to get those inside corners to fill out nicely;
6)  Getting a feel for different diameter elastic cords providing enough HOLD and yet not be too tight;
7)  How to better use a Crop a Dile Big Bite hole punch/eyelet setter.  Mainly gauging how to line it up is the trickiest for me but I'm getting better (as my next post will show); and
8)  Where to mark and cut a sheet of watercolor paper for the size pages I wanted making sure the folds were parallel to the grain.

Closed with loop finished cover.  I've left the cords long at the bottom as I haven't decided yet what I'm going to do with them.  Either cut off short or maybe add beads or something.


Would love to find a better way to attach the cover loop rather than having to make a huge knot so it doesn't slip through the eyelet.


Need more practice lining up the holes with the crop a dile punch/setter.


I don't think I did too badly for my first one :-)

Friday, March 16, 2018

A Midoris Traveler's Notebook Type Sketch Journal


My most recent project is creating a different type of journals for sketching and painting in.

The idea came from Laure Ferlita's post and the Midoris Traveler's Notebook you can get and refill with little notebooks by sliding them between elastic bands.

There are three signatures of four folded sheets of Fabriano Artistico Cold Press 104 lb watercolor paper and the size is about 3.5 x 5.5".  This gives you 16 pages each signature / 48 pages front and back to sketch on.

What I like about this idea is that the signatures are not permanently sewn together (at this point) and if you wat a 2 page spread or don't want to work with the bulk of the sketchbook, you can slide a page section out and work on it flat and then slide it back in.  Makes it easier too to scan for a digital copy of your artwork.

Once the signatures are completed with sketches/paintings, you can then sew the signatures together or just keep this book together and make another.  The elastic bands hold nicely.

This is a great way to mix paper surfaces up as well (watercolor paper, drawing paper, notebook pater, etc.) all in one little sketchbook.

I plan to play more using eyelets where the holes are punched in the cover and maybe adding beads and/or charms for a more decorative look.  I also want to explore sewn covers in place of faux leather once I figure out how to sew a straight line with a sewing machine..........lol.  Maybe add a pen look, as well :-)