Showing posts with label thoughts and notes. Show all posts

Wednesday, August 14, 2024

Texture Paper Settings with Digital Sketching

I don't always feel like adding a paper backing.  When printing notecards or even ATCs , by leaving that off, it takes less ink.  Plus I can choose textured paper to print on anyways.  For web viewing, I prefer a nice white background.  Texture hardly shows with the size resolution files I save for the web so it's actually useless to even bother.

When I do use a paper background, I try to go as light as I can but still see some texture.

Here is a comparison and visual reminder to myself what setting I might prefer to use if I include a paper background.


Monday, April 26, 2021

Chrysalis Two Different Methods

One of our neighbors with children raise Monarchs and while Terry was out walking Miya, he was called over to check out butterflies emerging from their Chrysalis.  He came back to the house to get his camera and went back over taking pictures and learning more about the process.

This family plants Milkweed in pots to attract Monarchs.  Eggs are laid followed by the caterpillars.  These caterpillars are fed the leaves of the milkweed to keep them around so they create their Chrysalis in the plants.  The family moves these plants inside a pop up screened housing you can purchase for this purpose and enjoy the time when the Monarchs emerge.  The wife also created a board with rope they hang under their outside porch light.  It's evident that the family takes a few of the Chrysalis by hand and tie to the rope where they stay until the butterflies emerge.  

How neat for those children to be apart of that experience!!!  I learned a lot from this as well.

Terry was told this continues until around October so we have plenty of time should Terry follow through with trying this himself.

From photos, I worked these both digitally and in my sketchbook.  I wanted the digital to be more like how I work in my sketchbooks rather than in depth or formal like I've been doing lately in Procreate (like the portraits and flowers, etc.).

This follows one of the photos Terry took - using Procreate and Gouache brush tool for color work and BJD's Standard Inker for line work and writing.


Then I decided to split between two pages as seen in my handsewn journal using old stock of Fabriano Hotpress paper (140lb).  One page worked with Urban Grey in TWSBI 580ALR and the other using #41 Brown in another TWSBI 580ALR foutain pen (both with F nibs).


Side Note:  When I started working on the hotpress paper with my fountain pens, I didn't like the feel of the nib moving across the paper.  I've worked on hotpress before and do not remember this at all even with EF nibs.  It felt like I was trying to draw or write on a paper with a coating somewhat like you'd find on wax paper.  And whatever it was appeared to collect on the nib and cause thicker lines and tiny blobs I didn't like.  At first my lines were real light and when I went back over them, it's like the grooves the nib made on the paper grabbed the next pass of ink and was really dark.  Was really weird. 

The first page I worked (out of three) was like this and I stopped what I was doing leaving the sketch unfinished.  I may return to that page later.  I decided to work on the next page for the above illustrations/writing and it was different.  I didn't have the issues on either of the next two pages.  I'm wondering if when making the books oil or something didn't end up on that one page.  Or maybe the old stock of paper I used is inconsistent with its sizing properties.  I won't know until I continue using this journal book.


Friday, September 11, 2020

Staedtler Mars Lumograph Pencil Chart on Alpha Surface

One of the things I like to do are charts on various paper surfaces based on how I use or apply various mediums.

I worked this chart in the Stillman and Birn Alpha sketchbook using Staedtler Mars Lumograph pencils.  Two pencils are missing from the set and I will have to order them to complete the chart but I can always add those later.  Although honestly, I'm questioning whether I really need those two grade pencils.

What this chart specifically tells me is that I would probably get the most use out of 4B and 2B.  Maybe HB but I can always use my mechanical pencil or the F or H in this set if necessary.

This shows where I can obtain dark values as seen with 8B just using a 4B pencil.  Although I'm sure I could go darker using 5,6,7 or 8B pencils than what is showing in the chart, I only go so far with pressure so not to damage the paper.  I'm not crazy about how bad the softer (and darker) graphite smears or how difficult it can be to erase.  4B seems to be the sweet spot for me out of the set with darks and ease in erasing.  Smearing is slightly less than those softer grades.  2B used initially when lightly sketching and 4B to darken.

I can't remember ever using any of the H grades and not sure I ever will.


Friday, March 20, 2020

Do You Save Your Blog Posts?

One of the things I do is save all my blog posts.  My blog is an extension to my actual journals where space is limited on a page for various notes and things I want to remember.  It's also a backup to my blogger.

Before I used a site called Blog 2 Book by BookSmith, which is easy to use but limited with format of blog posts and how images show up in the final document.

Last year I decided to manually save each post using Microsoft Word.  It's part of my posting routine now where I create the post on blogger and then copy and save to the word document.  I can then further format font and image size (without any preset sizes).  I keep a word document for each month with all the posts I share here on blogger (some which I create using blogger but do not make public) and once complete, convert a copy to a pdf where I can upload to Ipad or other electronic means.

My files are named with year first and then the month.  I've also been playing with making fancy covers for digital files uploaded to tablets, etc. but also keeping copies with the plain cover providing a choice if I choose to print.

My own personal art books I can share with multiple family members.  One of the reasons I like posting steps of how I went about doing things (when I remember to take photos or scans as I work.)


Thursday, March 12, 2020

Where Do You Like to Sit and Create When at Home?

It used to be I spent all my time in one dedicated location.............the sunroom.  That's back when we had eight people, 5 dogs, and 2 cats all under one roof...a moderate 3 bedroom house.  The large long dining room was split into two rooms partitioned off with cabinets with son and wife on one side and my two granddaughters on the other.  My other two sons shared a room plus Terry and I had our rooms.  It was quite cozy to say the least.

I had art supplies on shelves back in a walk in closet and my office/craft room out in the enclosed sunroom.

When the kiddos were able to get their own places, we had all this space and was able to spread out.  I moved my "office" up to the front in the room considered the dining room with the other half as a small living room.  I was able to bring out the shelves from the closet and place in the sunroom along with another table.  Nice set-up but I tend to stay up front even to sketch and paint. 

I love sitting at the window that looks out front....much more to see than sitting in the sunroom looking out the back that is fenced in.   I found a foyer table just big enough to work on and I find more and more of my daily used art supplies finding their way up with me :-)  I can watch the birds, work on the computer and watch TV without having to move to a separate room.  Plus I have a special chair up front I found I can sit in without agitating the nerve issues I deal with in my legs.

My husband teases me and tells everyone I've taken up 2/3rds of the house (which is probably right........ha ha).

Sunroom that I have access to from the bedroom and what we use as a dining room now.


Office area up front:


Part of the view out front:


Even when the curtains are drawn at night, I tend to work on this little table rather than the larger one on the other side of where I sit.  I have better lighting with a corner light than I do with the overhead light.

The other place I'll sit and work in my journal is sitting back in a rocker / recliner in bedroom with a lapboard.  I normally just use pencil or do the ink line work but I don't mess with watercolor unless in the other two locations mentioned above.

AND.......once in a blue moon, I'll sit out back on the patio and sketch with pencil.  I don't too often because I don't take the Florida heat and humidity well.

I always love seeing what other people do.........how they work and their set-ups.

Saturday, February 29, 2020

Photographed versus Scanned

Yesterday I worked on a watercolor sketch of my Golden Pothos plant.  As I worked, I took a few photographs over a two hour period as I leisurely worked this sketch.  Out of curiosity, I also scanned as I wanted to compare between camera and scanner with colors and tones. 

My scanner tends to "enhance" making the results a bit more vibrant with more contrast.  It doesn't pick up subtle changes in color variation nor does it do a great job picking up certain blues and yellows.  The scanner also does poorly with natural colors of paper like Arches versus bright white papers often appearing blotchy.

I never felt comfortable using a camera for my artwork because of white balance/color cast due to lighting but at least the camera lens picks up what the scanner does not.

In either case, I'm always having to try and fine tune in Photoshop Elements attempting to match actual tones and colors that I see in my journals.  The worst fine tuning when dealing with photographs being the need to remove the color cast or where part of an image might be brighter than another area. 

Using Camera:

For the photographs, I used my Samsung Note 8 camera.  The first two photos were taken within a thirty minute to an hour time frame so not much change in lighting from the window I was sitting at.  By the third photograph, the lighting was definitely different creating a bluish color cast I definitely had to try and fix.  In doing so, I lost part of the pencil line work of the plastic shelf unit the plant sits on.  All three I had to lighten a bit.  I really do not enjoy dealing with white balance issues.  Maybe if I understood it better and how to avoid in the first place, it wouldn't be so bad. 

Although working to remove color cast, the first two still have a yellowish to gray tone whereas the final photograph still shows a slight blue in the white of the paper.  At least the green colors picked up by the camera lens are closer to the actual colors and variations in the watercolor sketch. 


Using the Scanner:

I scanned twice making adjustments in the scanner's software.  Neither could pick up the green variations the camera lens on my phone picked up.

Left:  Auto correction in software at 24 Bit and 300 resolution

Right:  Turned off Auto setting and changed to 48 Bit and 300 resolution

What the difference is between 24 and 48 in how it affects colors, etc. is beyond me.   Something I'll have to do some research on. 

In comparison, turning off the auto correction picked up more of the blues that actual leaves have however still did not render correctly all the green variations in the sketch.  Both scans picked up more of the green making the results more lively than in the photographs.

The actual colors and tones on the page in my journal would fall somewhere between the final photograph above and the right scan below.......leaning more towards the photograph.


My final thoughts: 

I still prefer to scan since I often use my art images for making magnets, note cards, and other craft projects.  Scans are cleaner for printing.  Normally the only adjustment I have to make in Photoshop Elements is in the brightness/contrast controls.  The lighting with scanning is constant.  Just wish the scanner picked up the subtle variations in color that a camera lens can pick up.  For printing, I wouldn't want the texture of the paper to show.

As for the photographs.............even if I used my good DSLR, it makes no difference when dealing with white balance.  It might if I knew how to properly set the camera for different lighting situations that constantly change or had a better artificial lighting setup when taking photos of my artwork.  I do like that the camera can pick up the color variations the scanner does not plus it's ability to pick up the texture of the paper for times I might wish for it to show.......whereas the scanner does not. 


Thursday, November 14, 2019

Amazon Just Not the Same

For over the last two decades, my number one shopping source has been Amazon.  I bought practically everything through them from clothing to electronics to art supplies to household items and appliances.....as well as monthly grocery subscription items.   I would compare prices with other places and for the longest time found the prices were cheaper through Amazon.  Well it's no longer the case.

It used to be you could count on their Guaranteed Delivery dates minus UPS, USPS, or FedEx mix-ups but that too is no longer the case.  On the item page you might see you can count on delivery by a certain date only to learn AFTER placing the order that the dates are not as initially stated.

Used to be their customer service bent over backwards to work with their customers.  Now you basically get "oh so sorry for the inconvenience, BUT...."

Used to be if an item turned up lost in the mail or damaged, they would get a replacement right out to their customers.  That too is no longer the case.

Scams...........it happened to me this year where I ordered food storage containers only to receive a broken pencil.  Reached out to Amazon Customer Service and they did provide a return slip only for the return to be rejected and the broken pencil sent back to me.  I'm sure not all Marketplace vendors are untrustworthy but how do you know until you've been burnt who you can trust and who you can't.  You can't even go by company reviews.

Knockoffs..........again from experience ending up with what I thought was the real deal only to learn it wasn't.

Reviews cannot be trusted either.  I've learned that there are companies who have found multiple ways of generating fake reviews in their favor.

Used to be you could count on your items being packed well but now you're lucky to get a crumpled up piece of packing paper or a couple pillow packs stuck in the box.  And it's unreal the wastefulness of the company and their marketplace vendors sending out small sized items (often a single item at that) in huge boxes where contents bounce around during shipping.

As for paying the Prime membership.........I seriously wonder if it's worth it now that I fear placing orders through them.  I initially went with Prime because of the free shipping as it was worth it for a long time.  BUT, all other places do offer free shipping with minimum dollar orders that are easy to reach.  All the other benefits of Prime, I really don't use enough to warrant the high price, so why should I continue.   It keeps going up and yet their service continues to go downhill.  Something I'm going to have to really consider.

My latest attempt has been totally screwed up.  From one order, it was split up into several packages.  Three items were packaged together and shipped out only for an email sent to me the day it was to be delivered that the package was being returned to Amazon without a definitive reason.  Said I'd get a refund within 2-4 days after they receive the return but when will that be???  Another item was packaged by itself and managed to make it to me...a day late, mind you...yippeee!  And I'm still waiting on several other items that were supposed to be delivered on the 11th and I get a message they are running late.  Said I could cancel the order if not received by a certain date but they left the date off.  I go to cancel those items and I get an email saying cancellation failed and that they were in the middle of being processed and sent out.  Seriously???!!!!

I'm honestly afraid to shop Amazon anymore .........which is really sad.  I guess they've become too big and just can't handle things like they used to.  They don't appear to screen or care who sells through them because in the end, they get their commission.  As for customer satisfaction as it used to be..........the company is so big now that it doesn't appear to be of importance.  So sad to see quality and reliability become so diluted as it has with its growth.

The good news...............for places like Best Buy, Walmart, and the likes.......they are starting to regain customers from what I'm reading.  I'm definitely not alone in my disappointment and feelings..... more and more people are experiencing the same and worse.  At least with these other places, you can actually walk into a store or physically talk to someone in customer service or return without a lot of hassle (until their policies and service change.)


Friday, September 27, 2019

Konrad Fountain Pen and Zebra G Nib Hack

One of my close friends sent me a photo a couple mornings ago of her pen with a Zebra G nib replacing the standard nib.  She used a Noodler's Konrad pen to do the hack.  I've seen this done with Jinhao fountain pens but never using a Noodler's Konrad.

At one point (some time ago) I looked into maybe buying a Jinhao fountain pen to give it a try but decided against it due to the heat setting I didn't want to mess with.  After sharing with my friend about this, she mentioned if she could do it, so could I so I gave it a try since I already had Konrads just sitting in a drawer with no intentions of using (don't like the fiddly nibs and the bodies are not exactly of the highest quality).

First attempt was not real successful using a red body Konrad.  I had trouble getting the feed/nib into the body and also pulling back out.  Once I finally got it into the body, it took several attempts at heat setting using hot water (brought just to boiling in microwave).   One has to dip the feed/nib into the hot water and hold it there for about 30 seconds to soften the ebonite (rubber) feed and then press the feed into the nib while it cools.

I managed to get the feed to almost fit the nib but there was still a gap I needed to continue working on.  The feed needed to be closer to or resting against the inside curve of the nib there near the tines.  After several attempts, I was able to get it rather close and decided to try the pen out.

The pen itself leaked ink where the feed/nib fit into the body.  Upon close examination, I found the opening was warped.  Not sure if that was already an issue or if the hot water did anything to the plastic.


Went back and grabbed another Konrad (yellow/orange body) and using the feed/nib I was already working with, went through the same process only this time with the different body.  It worked after only one attempt with the heat setting ... allowing me to place the feed/nib into the body and pull out without too much trouble.  The feed finally "molded" to the G nib to include near the tines.


Loaded the pen with ink and now after a couple days later, all seems well.  There is no leakage where feed/nib go into the body and it's feeding ink OK.   Not as efficiently as it would with the regular fountain pen nib but well enough without too much hassle.

Personal notes after playing and doing more research (after the hack):

G Nibs are super scratchy and do not do well on paper with any tooth.

G Nibs are meant to be used with dip pen bodies and thicker ink....ink that is not designed to work in fountain pens as they will clog and damage the pens.

G nibs are not meant to be in constant contact with ink as they will quickly rust.  If hacked into a fountain pen, rusting could cause issues trying to change out the nib to a fresh one..........possibly ruining the pen.

G nibs wear out quickly and why you get several in a pack.  Not sure I'd want to have to mess with changing them out.........especially if I have to go through heat setting each one to the same feed.....seems kind of a hassle to me.

Not sure I really needed to do this as I'm really not concerned with thick/thin lines in my sketches like Manga artists try to achieve.  Nor do I try to work calligraphy style lettering.  I find working thin and thick to be taxing on my hand; and, too time consuming and I really don't have that much patience with lettering.  I prefer other artsy methods of adding wording to my pages.  But I guess it was worth experimenting just to see if I could do what several other people are doing by hacking a dip pen nib to a fountain pen body.

Doodling with the hacked pen:


Saturday, July 20, 2019

Comparing My Pilot Falcon to the Vanishing Point Pen

Thought I would compare my two higher end pens to one another - Falcon vs Vanishing Point.

Pilot Falcon - "Soft" Gold Nib with Rhodium plating / Medium Flex / Extra Fine (EF)

Loaded with Noodler's Lexington Grey Ink

One of my favorites but one I seldom take out with me out of fear of losing.  Plus I tend to baby it here at home as well.  It has a wetter feed compared to my other fountain pens (exception TWSBI pens) so I don't always go to grab it like I do the Lamy pens.  Reason being impatience.  With a wetter feed, one has to give the ink more drying time before attempting to erase pencil and add color.  With a wet feed, the lines are starker, as well, even with a soft black or gray ink.  I'm very careful using it on toothy paper as well for fear of damaging the tines or getting lint stuck in the tines. 

Pilot Vanishing Point - Retractable Nib Pen - 18K Gold (no plating) / Fine (F)

Loaded with DeAtramentis Urban Grey Ink

Newest addition to my fountain pen collection.  LOVE the fact the nib retracts into the body of the pen.  The F Nib, so far, is proving to result in finer lines than the Falcon EF nib.  It's a dryer feed than my Falcon but a bit wetter compared to my Lamy pens or the Pilot Platinum.  I might prove different with another brand ink but I won't know that until a later time should I decide to change inks.

This shows the difference between the two Pilot pens in addition to comparing with the Lamy that I used for most of the writing.  It's loaded with DeAtramentis Urban Grey and has an EF nib.  It feeds wetter than the Vanishing Point.......darker lines.


I'm wondering if the Vanishing Point F nib produces a finer line than the EFs because only a very small portion sticks out of the pen body.  Plus it being much smaller than most fountain pen nibs. 

Thursday, July 18, 2019

Sketchbook vs Art Journal vs Visual Journal vs Artist's Journal

I've been asked this question several times and have had trouble really expressing my own thoughts or feelings on the subject....until now.

Is there really a difference between the terms?  Honestly, in my humble opinion, I think it's subjective and totally individual what each term might mean or if there is really any difference between them or not.

To me, I do tend to differentiate between the terms and this post shares my own personal thoughts in how I view each:

First off, what is a Journal?  To me it's a fancier term for what we used to call a Dairy.  A place we could freely express our feelings and thoughts in written form (hoping no one else ever saw the contents.....lol).  A private personal place not intended to be shared with other people.

How I view each term:

Sketchbook - Raw and less defined.  Something that may be more for one's own benefit that is either kept private or content of interest possibly shared that might be beneficial for another artist (technique, etc).  A book to practice ideas, play, doodle, experiment with various materials / techniques, a collection of roughly worked out illustrations with intent to use for more formal or professional work.

Sometimes the term "junk" journal comes to mind where there's no real concern about how something turns out and a place that gives people internal permission to just play and not care about the results.

A place to work where one's inner critic tends to stay quiet.

Art Journal - More defined works of art.  A collection or showcase of sketches, paintings, more fine-tuned, and is all about the art itself and its outcome.  Page after page of artistic expression that might include mixed media, collage, use of stencils, stamps, etc.  More in line with results and presentation subject to viewing, comparison, judging or critiquing.

Visual Journal - An illustrated diary.  More personal in nature and more about the act of doing or process for various reasons.  A place of healing.  A place to illustrate and write about events, places, people, feelings/emotions, day to day life of the individual working in the journal.  Often more private.  A form of stress relief, a quiet place one can lose themselves....an escape.  A nice haven in which one can focus on something positive rather than negative or getting negative feelings out and onto paper in an artistic or creative manner.

Artist's Journal - A collection of all of the above that relates to the individual artist's day to day life.  An overlapping of all three listed above under one cover.  Can be private or open to sharing.  All visually illustrated or a combination of visual and written word.  Formal or less formal.  Complete or incomplete.  A combination of process, personal healing/therapy, and product presentation.  A place where one can do anything they want and how they want.  No rules / no rights or wrongs!  Personal expression, experiences, memories, playtime, safe haven to escape to, and place for therapeutic healing.  It can be anything one wants it to be without fear of judgement (outside of one's self....ha ha).

So.........how do you interpret or distinguish between the terms we see and hear all the time?   Have you really given it much thought?

Friday, March 15, 2019

More on Grumbacher Watercolor In and Out Sketchbook

The more I work in this sketchbook, the more I realize it's not going to be for me.  There are too many other sketchbooks I like better that work best for how I work.  Plus I can also make my own with much better paper choices than what most journals out there offer.

Personal Notes / Findings:

Although you can lift, the paper does damage even with light brush work.  It really shows when applying pigment over that area after it dries. 

It's too easy to end up with a blotchy look since the pigment just sits on top of the sized paper and it's not something I would want to happen with many subjects. 

The surface sizing also feels like or appears to not be consistent over the entire surface.  Some areas  blotch or bead more easily than other areas.  Now that might also be attributed to possible oils on my hand as I sketch and work the ink lines but I try to be careful making sure my hands are clean.  It's more apparent working on a larger scale like this page versus several little illustrations on a page.

Fountain pen ink tends to take too long to dry (for my liking) so I've been using a Sharpie pen instead.  Not a huge deal but I like using various pens and inks.

Pencil erases very cleanly unlike some other papers.......at least the HB pencil I've been using.  Haven't tried softer or darker lead pencils.

Definitely not what I personally consider top quality art paper..........more on the line of student grade.

The ability to remove and replace pages is a really nice concept but for me not worth the other less desirable characteristics as mentioned above.

This paper might work very well for other people depending on how they work but I honestly am not that crazy about it.


Saturday, March 9, 2019

Trying Out Grumbacher Watercolor In and Out Journal Book

Yesterday I stopped at our local art supply shop called DK Art Supplies.  I hadn't been there since they expanded mid last year.

I was really impressed with the layout and how everything was being displayed making it more enjoyable to shop there.

The owner, Dennis, was sharing about the changes and the supplies he carries and letting me know if he doesn't have in stock, he can always order anything we might want.  Then talking about particular graphite between water soluble to standard to Artgraf color graphite bars and kneaded graphite I had never heard of before.  Really interesting what companies keep coming up with.

What I really like about this place and the owner, he's quick to do little demonstrations showing what one can expect with various supplies before you buy.

Then he was showing me the Grumbacher In and Out journals that are spiral bound but pages cut to where you can remove them and then put back in place in any order you wish.

I like the fact you can remove the page for laying flat in the scanner and then return it to sketchbook.


I'd never painted or sketched on Grumbacher paper so I was intrigued and bought a 7 x 10 watercolor journal.  It has 12 pages 140 lb acid free paper which is heavily sized for lifting and blending.  I personally like paper like that with how I work.

These are just a few play examples as I get a feel for the paper surface.  Front has a hilly surface and the back is silky smooth.

So far this is playing a little with watercolor and with water soluble graphite (Wolf's Carbon pencil B).  Also did a quick ink smear test but not waiting any real time before trying to smear.  I wanted to know how careful I needed to be writing or sketching moving my hand around the paper as I worked.


Sunday, January 27, 2019

One of Those Days

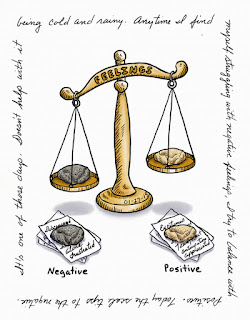
Today I've been sketching how I feel......the battle I often fight as I try to retrain how I think and feel about various things. 

I've always been the pessimist thinking that if I expect the worse, it would help when things go wrong versus expecting the better and things not work out.  It's taken a lifetime to realize expecting the worse is not the way to deal with things opening one's self to an ongoing depressed state of mind.  So for the last almost five years I have been trying to counter all negative thoughts and feelings by trying to find positives.  Some days that battle is far more difficult to fight than others.

Our weather today is not helping matters as it's quite chilly and has been raining all day which plays havoc with my mental/emotional state of mind.  It reminds me of how I felt most days when living up north and very thankful we're now in the south where all day gray or rainy days are not the normal.  And feeling as I do, I thought I would lose myself in sketching those feelings out.


Sunday, December 9, 2018

Hard Lesson Learned - Rohrer & Klingner Sketch Inks

I SHOULD have known better than jumping into filling SEVERAL pens with a new ink brand claiming to be safe for fountain pens.  I SHOULD have only tested in one pen rather than filling nine with different colors.

When I read about Rohrer & Klingner's Sketch Inks and compared the price against other well known bottled inks, I was excited.  I was excited with the choice of colors and jumped right in filling pens and testing them out between illustrations and writing.  I had even bought more Lamy Safari pens with different color barrels or clear barrels to see the colors they held.....just to house these inks.

WHAT A STUPID THING TO DO ON MY PART without first testing with one pen only !!!

Now, with all my other pens that range from Pilots to Lamy to TWSBI, as well as Noodler's fountain pens, I treat them all the same.  I'm not the greatest at regular pen maintenance and I have several filled with Lexington Gray or Platinum Carbon inks allowing them to sit for weeks and even months without being used.  I even have a Platinum Carbon Desk Pen filled with brown ink known to cause havoc in some pens that doesn't cause me grief.  The worst problem I've ever had was having to dip a pen feed/nib into water to help get it "jump" started (and part of that may be due to how I store my pens, which are standing - cap end up - in a pen display).  I've NEVER had a problem with total clogging and not feeding the ink.

Then Sketch Inks come along.  I found that even sitting a few days unused, they started showing problems of wanting to write or feed ink.  When I first saw that happening, that SHOULD have alerted me to clean them out immediately.  Unfortunately, I did not do that.  They sat for weeks unused....dreading having to clean them all....and now I'm paying the price, which MAY prove to be a costly one.

First I worked on cleaning one pen and immediately found it was going to be quite a task to do so.  The ink dries inside almost like a glue.  I couldn't get the nib off the pen even after soaking in warm water for hours (renewing warm water as it got cold) and flushing using a bulb to force water through the end of the pen feed/nib section.  I found the converter was just as challenging to clean out all the ink.  I cleaned the best I could still not being able to remove the nib.  I did NOT use a cleaning solution but only plain tap water.

I tried filled this pen with my trusty Lexington Gray Ink and it would not feed the ink.  I thought for sure the pen was trashed.

Yesterday I took on the task of cleaning all the pens I had loaded with the Sketch Ink.  Instead of warm water, I used hot tap water......replacing as the water got cold.  Off and on throughout the day I soaked and flushed with a bulb and syringe forcing hot water through the pieces.  After several hours of doing this, little slivers and specks were showing up in the bottom of the containers I was using.  

Next, I used fountain pen cleaner solution purchased through Goulet Pens that smells like it has ammonia in it that I forced through the feeds with the bulb.  Soaked and flushed some more with plain hot water.  Even more flecks and slivers showed up.

Then I tried removing the nibs again, including the first one I tried cleaning (I hadn't totally given up on it yet).  I finally got all the nibs off but took me having to pry them with a knife.........trying not to damage the feed.  I was right........they were basically "glued" in place with dried ink even after all that soaking time.  I had to take a brush to the feed where the nib sits as well as the little metal nibs to remove the stuck on ink.

Container with six of the nine pens I'm having to clean......hoping to work again:


Flecks showing up with plain hot water soaks:


After several hours soaking and then taking cleaning fluid and bulb to flush the feeds:


Here we are more than 24 hours later of soaking/flushing and I still have ink showing in the channels of my feeds.  Now I'm taking a blunt needle syringe and forcing cleaning solution and hot water from the hole in the end of the feed where the nib sits trying to loosen what's in those channels.  Then flushing using the bulb from the other end.

I wish I could remove the feed so I can brush the grooves and channel; but, even when not stopped up with ink (that binds like a glue) they are not easy to remove from Lamy pens.  It's possible and I've watched videos on how to do so but if I had to pry a nib off that's suppose to remove easily, I don't dare try to remove the feed.


UPDATE:  The first pen I cleaned and tried to use is now working again using Lexy Gray ink.  Because it's a black pen and I cannot see through to the feed, I don't know if it's flowing at full capacity or not.  BUT, it's working so far and I truly thought I would have to trash the pen.

As for the remaining eight pen feeds and converters.......they are still soaking.

Will try to update the results in another post once I finish the cleaning and if or when I fill those other eight pens with colored inks from another brand.  I don't need eight more pens filled with Lexington Gray or Platinum Carbon ink so may be awhile before I learn if they will ever feed ink again for sketching and writing.

So be warned by my stupidity not to always believe what a manufacturer claims as safe for fountain pens.  Test only ONE pen and one that doesn't cost a fortune if it's ruined or you can't purchase replacement parts.


Friday, October 19, 2018

What Motivates You With Your Art?

Although I try to sketch every day, there are spells I hit where I just don't feel like it or life gets in the way of doing so.  With me......if I let those spells drag out, I tend to find excuses not to get started back into it. 

To help motivate myself, I set several goals each year and look for various times/opportunities I know will help re-ignite that spark if in a slump.  These are not in any specific order or importance.

The 365 Sketch a Year Goal - Rather than making this too rigid to allow for days life gets in the way or I just don't feel up to sketching, I set a 365 sketch per year goal versus sketching every day for 365 days.

I met this particular goal by the end of May :-)

Monthly Goal Between Friends - This one is where a friend/sister in the UK and I alternate months setting a monthly goal.  We decide subject and normally require at least six illustrations in various mediums each month.  So far I've been able to keep up with only two months remaining.

Inktober - I always look forward to October for this challenge.  I may not follow the prompt list but I like the challenge of producing an ink sketch each day of the month.  The purpose for me is to hone my skills with hatching and cross hatching or other means of producing form and tone values within a sketch (like stippling).  This includes digital sketching.

Sketchcrawls with Friends - During the cooler months we try to schedule about 4 outings a month.  During the hotter months, we strive for at least 2 outings a month.  Most I have participated but there have been several due to health reasons that kept me from physically going out.  But even if I don't go out, I still try to sketch something of the place scheduled from photos I've taken from previous outings at the same locations.

Testing New and Old Supplies - Nothing motivates me like learning about new materials.  I love testing and playing with new papers, new pens, new inks, etc. etc.  AND if nothing new, I'll bring out materials and supplies that tend to take a backseat to my normal choices .....like color pencils, pastel pencils, watercolor pencils, NeoColor II Crayons, etc.

Recording Gifts, Keepsakes, and Other Treasures - Anytime I receive a gift or one of the family members finds something out and about they think I'd like to sketch, I try to record them in one of my journals. 

I'm also a big kid at heart with stuffed animals calling out to me to sketch and paint from time to time.  Even those I've had for years.  They all have sentimental value which makes them special to sketch when nothing else strikes my fancy.

Difficult/Challenging Subjects -  From time to time I like to set personal challenges to face my fears with certain subjects I tend to avoid.............like multi petal flowers, facial features, people in general, etc.  Another subject is buildings (except old barns) because all the detail boggles my brain.  I try to challenge myself to work through all the detail but have to be in the right frame of mind to do so.

One such challenge I've done a couple of times is Brenda Swenson's 75 Day Ink Challenge.  It may be time to do it again because I still don't feel comfortable jumping in with pen only.  Eventually I MIGHT get past that (or not).  :-)

Helping Someone Out - This is another major motivator for me.  If I learn someone is struggling with a particular subject or medium, there's something inside of me that wants to try and help if I can.  Maybe work through on my own taking camera shots or scans and sometimes videos of my process hoping it might help another person out. 

Mental/Emotional Therapy - When I need to focus on something positive or to release myself from stress and turmoil and sometimes physical pain, I look to and try to lose myself in my journals.......if I can.  If I can concentrate on a drawing, it's a sweet escape for a little while.

New Places - I don't get out too often but when I do, I love to record places I've been.  Most often from photos I take for the purpose of sketching/painting later at home. 

Social Media, Blogs, Art Websites, Books, Videos - Even when I'm in an actual slump, I spend hours every day looking at what others have done.  I follow certain art groups on Facebook, search the web for artists and their works, maybe grab a book off my shelf, view a DVD or check out YouTube watching others work through their sketches and paintings (tutorials).  I don't think there's a day that goes by I don't have sketching and painting on my mind........lol

And now that I've mentioned what helps motivate me, here are those situations that do not:

Special Requests and Commissions - Asking me to paint or sketch a particular subject someone wants me to do to especially include adding a $$ amount to it.  I just won't do it.  I'm happy to share something I've already done as a gift but as soon as a $$ amount is mentioned or a special request is made, I avoid it like the plague.

Competitions and Shows - This is something I just won't subject myself to.  It's too stressful and for me takes the joy out of wanting to do any type of artwork.  I already struggle in the confidence department so to subject my work being judged and/or critiqued.........no thank you.  Been there, experienced that and one major reason I changed to keeping artist journals instead of full size drawings and paintings.  I no longer feel I have to try to impress or please anyone but myself.  By working in a journal, I'm free to do what I want, how I want......and learning to accept and even embrace my imperfections.  The only judge I have to be concerned with is my inner critic and I've finally learned to tell it to back off........lol

Prompt Lists - I'm just not one who enjoys following a prompt list.  I don't like trying to decide what to sketch that fits that particular prompt.  Instead something has to call out to me and I never know from day to day what that might be.  If something doesn't interest me at that moment, I just can't bring myself to bother.

When I'm Really Sick - I just want to sleep.........ha ha.


Tuesday, October 16, 2018

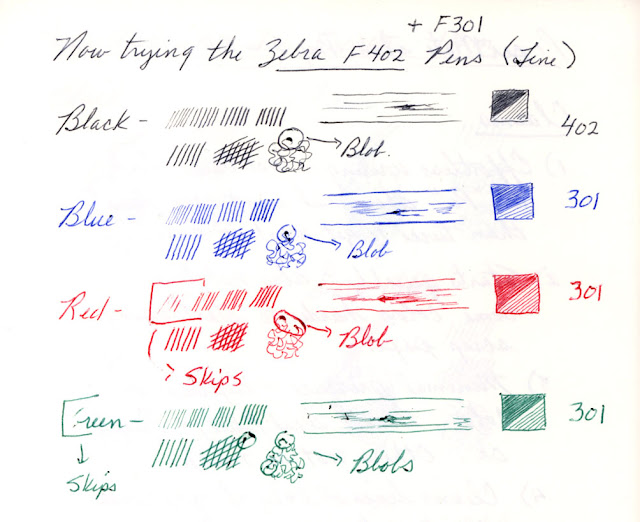
Zebra F402 and F301 Ballpoint Pens

Tucked away in a drawer, I found these Zebra pens and thought I would check them out in two of the journals the Ink Joys did so poorly in.


Fabriano Venezia:

I would prefer a medium point for sketching but these fine points didn't do too badly!

I find the fine points take a bit more pressure to achieve the darker marks I need but I was able to get nice light to dark values similar to those I could get with the PaperMate Stick ballpoint pen (just takes longer and more strokes due to the fine lines).

The transition or blending of light to dark appears smooth.....not choppy and inconsistent like I found with the Ink Joy pens.

There can be slight skipping but not too bad.  At this point I'm not sure if the skipping and extra pressure is to be expected all the time or if because these pens have sat for a very long time possibly contributing to that.  I honestly wouldn't know unless I bought fresh new refills.

As for blobs, they happen but occasionally wiping the points on a paper towel helps keep them at a minimum.  Plus with a finer point, the blobs are smaller.

I would definitely use these for sketching.


UPDATE: after original blog post.  Worked an acorn with the F402 (black) and it definitely compares with the PaperMate Stick pen :-D


Handbook:

I tested these pens in the Handbook before I tried in the Venezia sketchbook.

With this paper, the pens only did OK.  With the fine points and paper texture, there was a bit more skipping and several ink blobs.  However, I did NOT wipe the pen points at any time like I occasionally did when sketching the knots in the Venezia sketchbook.

Even though I had a little trouble on this paper, I can work with these pens for sketching.  However, these would not be my first choice........not in this sketchbook.

Monday, October 15, 2018

PaperMate Ink Joy 500 RT Pens - Part 2

Rather than just testing on one other paper surface, I did so on two as mentioned below.  I really was hoping to find it was just the paper in the Handbook that brought out any flaws these pens might have.  Unfortunately, I found it's not just the Handbook.

This first is using Fabriano Venezia Drawing Journal Book.  The paper is a bit smoother than the Handbook.

Although the pens behaved a little better on this paper surface, I'm still not impressed and would not recommend for sketching on similar paper surfaces.  In fact, I wouldn't want to write with them either on similar papers.

Some of the color inks didn't do well with light to normal pressure.  I had to put more pressure to get my marks and some skipped.  My hand quickly felt fatigued because of the added pressure I had to use just for these simple test marks.

Several colors resulted in pooled ink blobs.  As noted on the page, I wiped the tip/point only once at the very beginning as I wanted to see how bad the ink would pool up (see closeup).


Closeup to problem areas:


This next test is using the PaperBlanks brand journal with unlined writing paper.  The surface is slick.

I found I could make marks with less pressure and no skipping.  Definitely more consistent compared to the other two papers I've tried these on.

Only slight ink blobbing and this time I didn't even wipe the tips/points.

If I used the PaperBlanks journal for sketching, it wouldn't be too frustrating.  The problem is the paper is thin and not meant to take wet media.  If just working pen and ink.........I MIGHT actually sketch with these pens.


Final thoughts...........These pens will probably end up in the bottom of a drawer seldom to never seeing the light of day...........lol

PaperMate Ink Joy 500 RT Pens - Part 1

After the good results I've had with the PaperMate stick pen I have, I purchased a package of Ink Joy 500 RTs in various colors as recommended by another sketcher and other reviews.


My testing was immediately after opening the package and removing the little bead the company puts on the points to keep them fresh.

For Part 1, I am using the Global Arts Handbook, which I've had good luck with the standard stick pen (by same company).


Initial feelings with Ink Joy 500 RT - DISAPPOINTED

1)  I had to scribble on paper now and then just to get the pen to make a mark on paper (even after they had been making marks on paper).  Sometimes I had to go over lines or marks several times before I could even get a mark to show.  This was more of a problem with the other than normal Blues, Blacks, and Reds; but, even my black pen gave me trouble.  (The right page in the heading shows I had trouble with the Black pen.)

Is it pen or paper?  That remains to be seen after I experiment on other paper.  (Part 2).

2)  I could not get a nice even hatching and couldn't transition from light to dark very easily.....not like I can with the stick pen shown above.

Example:   This shows how nicely I was able to hatch and transition from lighter to darker values without much effort..........almost like using a graphite pencil..........using the cheap PaperMate stick pen.  See the wood behind the foreground jug.

I was trying to achieve the same type of marks with the Ink Joys.  There was no way because the ink flow was inconsistent with some of the pens having to use a heavy pressure just to make a mark.

Note:  The Ink Joys AND the stick pen are the same point size......... 1.0 m


3)  These pens end up with a buildup of ink on the point easily and quickly.  I had to wipe the point often, which I find to be a pain.  If a blob ended up on the paper (which it did several times even wiping often), it could smear if not careful.  I only had to do that once in awhile with the stick pen and that was with heavy sketching as I did as shown above.


Close-up of some of the problem areas:


I rely on reviews before I spend money on anything.  I take time to read what people say.....especially the negative reviews.  At the same time, I know that what works for one person may not work for another.  Best to try yourself with the papers you use to see just how something might work.  Only problem.........you have to spend the money to find out :-(   I found the same problem with the Bic Crystal pens everyone raved about and I didn't much care for mainly because of the blobs.  Some ballpoints are worse than others with this issue.

We'll see how I feel when I try other papers.  To be Continued..................