Showing posts with label exercise. Show all posts

Wednesday, April 7, 2021

Cross-Hatching Procreate vs Paper

Well, the jury's back............cross-hatching is proving to be my least favorite thing to do...at least with ballpoint.  If I have to do this much cross-hatching to fill in a subject, I prefer digital.  

As mentioned in a previous post, one doesn't have to worry about ink pooling resulting in ink blobs working digital.  You don't have to worry about constantly wiping the point on tissue which I find is disruptive in workflow.  One can set the opacity rather than totally relying on pressure holding a pen.  With the Apple pencil, you can use both to your advantage.  And due to the fact you don't have to rely on pressure, it's easier on the hand.

Not sure I will actually produce a portrait using cross-hatching as it would probably take me days versus hours to complete but that might change.  In comparing the two below, I do like the results of the pepper worked in Procreate but not sure I have THAT much patience to work something as complex as a portrait.  We shall see.  I do admit that this can be therapeutic....very relaxing (if not having to constantly worry about blobs).


 Just for fun, I took my original and added color blending mode layers to produce the following.


Sunday, April 4, 2021

Hatching / Cross-Hatching Exercise

Today I started a new course by Robin Hilthouse - Portraits In Pen

The lessons start out going over the difference between cavities (craters as some might call them) and bumps on skin using cross-hatching.

As much as I love good ballpoint sketch results by artists, I am not sure I will be one to really get into using ballpoints too often.  I am finding right off that it takes a LOT of patience, which I am not sure I have enough for this process.  Ballpoint also causes me a bit of frustration due to ink pooling at the points and creating blobs on the paper.  Even wiping the pen often I find they still occur.  And the other issue I'm dealing with is hand fatigue, thumb/finger tingling, and cramping in my hand.  At first I thought it was just the BIC pen causing these issues but I'm quickly learning it doesn't matter which pen I use...the BIC or the Zebra.  What's funny is that the Apple Pencil, regular or mechanical pencils, and fountain pens do not do this to me unless I have been non-stop for hours at a time.  With the ballpoint, I'm lucky if I make it 15 to 20 minutes before having to stop and take a break.

This exercise I worked both with ballpoint in my Alpha sketchbook and also on the Ipad using Procreate.  I find it less taxing on my hand working on the Ipad versus pen to paper.  My lines are more consistent in value as I lay down each hatch mark.  It helps that I can change the opaque value where I don't have to totally rely on pen pressure like I have to with the ballpoint.  I normally have a light touch anyways but find with the ballpoint, my lines can sometimes go down darker than I want.  Major plus with the Ipad.......no blobs!!!

I will continue with the course and see how my feelings are later with regards to Ballpoint.  The major reason I wanted to take the course was to learn how other artists use hatching and cross-hatching which can be done in pen or pencil and even on the Ipad.


Sunday, September 6, 2020

Practice Sketching Birds

Over the last couple of days, I have been watching (and sketching along the way) a few videos on Drawing Birds by John Muir Laws.  Although I've sketched and painted birds for years, I never knew the anatomy of birds and thought by learning this, it might help me improve on results.  If nothing else, it would help to be able to identify which part of the bird I'm working on and learning what I can simplify and still end up with decent results.

I worked these as reference I can fall back on if necessary.  Fab Hotpress / TWSBI Eco with Urban Grey ink.


Using a model from the video, I worked this bird in graphite.  Then added ink and then decided to add some color.  This was basically playing with three different techniques within the same bird sketch.


While I worked the pencil sketch, I didn't think to scan the steps I chose to use from how John works his bird sketches so I tried to recreate those steps using Procreate on the Ipad.  I find using the circles or ovals like he does for head and body proportions throws me off.  I do better this way by focusing on the contour lines and how each curve or line relates in distance and placement to other areas around it.


Wednesday, March 13, 2019

Some People Practice

Next month is the yearly 100 people in five days challenge set by Marc Taro Holmes and Liz Steele.  I attempted that last year and after about 50 said forget it!!!  That was following day to day practice I had already started on my own with people and figure gestures and I was so sick of people, I didn't even want to think about them much less actually sketch them.

But it's been awhile so I decided to work a few timed exercises with ink only allowing 2 minutes to work each of these figures.

Handmade African Journal received as a gift back in 2008 / Pen and Ink as stated on pages.


Sunday, February 10, 2019

Revisit Sketching Hands

Like many people, I used to be very intimidated by the sheer thought of trying to draw hands.  What helped me was first working with a thumb and finger.  Once I felt comfortable with those, I then tackled the hand.

Another thing that helped me was using the blending technique.  If I could get the contour line drawn correctly, I would then work with the form dragging and moving graphite in from the edges with a tortillon or paper stump.  Not sure why but I prefer the tortillon.

At a future Library Tuesday Meetup with our sketching group and guests, I hope to share my process hoping it might help others get past their fear of drawing hands.

These are examples of what I've been working on for practice and for sharing....using different type pencils on a couple different paper surfaces; with or without a tortillon and one example I used a paper stump.

I need to do more practice without blending by using the pencil itself to softly blend pencil strokes.  I tend to be a bit impatient and instead grab the tortillon. 

Copier Paper:


Stonehenge 90 Paper


Newsprint scanned as document instead of photo to remove the brownish color of the paper (for printing purposes).


These were done a few years ago on cartridge paper when I was first learning to work on hands.


Wednesday, January 9, 2019

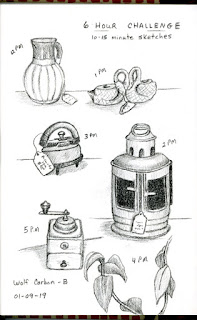
Six Hour 10 to 15 Minutes Sketches

Today I decided to work some quick sketches each hour for six hours.  I used photos from yesterday's sketchcrawl at Roosters on Oxford as reference material.

Most were done within 10 minutes except the larger lamp looking gizmo that took about 15 minutes.  The ivy I started but was interrupted shortly after I began sketching so I didn't get very far. 

Although I consider this as quick sketching, I'm still taking care in my line work.

Didn't allow myself any erasing but instead started out with very light pressure and then darkened the lines once I was happy with how things were looking.

Worked in Fabriano Venezia with Wolf's Carbon pencil - B

Thursday, September 20, 2018

Gift - Set of Wolff's Carbon Pencils

This week we had a sketch outing and one of the gals gifted me with a set of carbon pencils - B, 2B, 4B, and 6B

I've been playing with them and find I really like the wash ability they provide as they are water soluble although I don't recall seeing any reference to that.  I always test so that no surprises if wanting to take watercolor to my pencil sketches.


Initial findings as I compare each grade of pencil.........they all can go very dark in value to include the B.  What makes each different (at least to me at this point) is that it takes less pressure to obtain those darker values the softer the grade.

The darker, of course, smears more easily and I'm one who doesn't think to lay a piece of paper down or tissue to keep my hand/fingers from hitting areas already drawn and making smudge marks.  Example of that is evident below.


The bottom of the above example was my taking the 6B pencil and scribbling a dark block on a piece of cardboard.  Then took a damp to wet brush mixing that block and then to paper.

This next example is using the 6B and working a line sketch first and taking damp brush to create the wash on paper.  Some areas were still damp when I penciled back over and other areas had already dried providing a nice textured look.


When posting in a Facebook group I'm in, someone asked if the carbon still smudged after taking water to it.........so of course I had to give that a test run as well.  Here are my results:


Exploring that further, I wanted to see how it would work taking water to the carbon and then applying watercolor over it.  Although colors are muted due to the under lying wash tones, they still remained what I would consider clean.  Best area to show that is the yellow flower on the hat. 

For this example I only used the B pencil.  I worked the line drawing to include some hatching and then took the wet brush "painting" with water.  I allowed it to completely dry.  Then without fiddling, I brushed over with watercolor. 

Not sure I'd want to use the softer grades but I may later test that out as well.  I normally don't like going too dark with pencil lines anyway if I'm going to ink and/or add color.  And even with regular graphite I have found I need to take care on how dark because even graphite can dirty colors like yellow when applied.


All examples were worked on Bee Aquabee Super Deluxe paper.


Wednesday, August 15, 2018

New Toy - Scan N Cut 2 - Making Stencils

For over a year I've been considering a Cricut machine for making stencils.  I tried using a stencil burning tool but to me was too slow and too tedious with less than desirable results.  As I was ready to take the plunge, I wrote a dear friend (very knowledgeable with various crafts and gizmos) telling her what I was hoping to do and asking which machine I should get.  One of the main things I hoped to achieve was to be able to use shapes of some of my own drawings (like bears or people).  She recommended instead of the Cricut, to get the Scan N Cut machine because that way I could scan in my own artwork.

The stencils I want to make are for my journaling.  My goal is to make stencils the size of a journal page with all the shapes repetitively laid to fit on that page..........like squares or circles for making color or ink charts. etc.   This would save me time compared to taking ruler and pen drawing all the lines and shapes needed or using a single stencil shape and having to repeat it over and over until I achieved the number I needed on the page.

Other shapes I want to make, like my bears, are so I can quickly get them sketched on a page in order to play with wet in wet colors and then go back and add details (as shown below).

I spent hours using photoshop elements to create my originals to scan of repeated shapes and a few of my bears and people.  Then yesterday I spent the entire day getting them into the Scan N Cut and finally cutting my stencils.  I think once I have the mechanics down with steps necessary, it won't take as long.  I'm still learning my machine and the menu structure.


How I've used a couple of the stencils so far:

The stencil with squares helped me to work exercises I'm doing with pen and ink.  The left page was worked first using a stencil I had with a single square.  I had to make each square one at a time lining them up to each other.  Took quite a bit of time to get all my squares down on the page.

The page on the right was using my created stencil making it so much easier and quicker so I could get right to my pen stroke practice.


This next shows how I can use shapes from my own sketches.  I located my digital scanned files of my mini bear I've sketched and/or painted in various poses.

Next I created this page group changing to black and white by using the threshold adjustment in Photoshop Elements.   I printed these off and then took a black magic marker to outline each shape to make it easier for the Scan N Cut to determine a nice smooth outline for cutting.


I had to then split these up into two files to fit on the size template material I'd be using as you can see in the photo of stencils above showing the templates I created.

This evening I thought I would try one of my bear template shapes to play with color wet in wet.  This page was worked in the Strathmore Visual WC journal using my Sharpie Pen (F).  The first bear I worked is to the far right.  I worked the softer looking bear second and find I really like the triad combination I chose.


Steps photographed (cell phone) along the way (forgot to photograph the initial pencil outline from stencil....ooops).


Tuesday, July 24, 2018

Spontaneous Painting Following Steve Mitchell (Mind of Watercolor)

As one who needs to see something in front of her to sketch or paint, I decided to step outside my comfort zone using some imagination to produce this.   This exercise is following Steve Mitchell - Mind of Watercolor - video tutorial on YouTube.

This was fun but also a bit of a strain on my brain as I tried to work through seeing and producing the shapes with pen and ink.  Reminds me of looking to the sky and visualizing shapes in clouds or shapes seen in wood grain and floor tiles.   I need to do more of this :-) 

With kind permission from Steve Mitchell, I'm sharing my results. 

Worked in the Strathmore Visual WC journal.  I used an American Painter 4400 - 5/8" angular flat to lay down the color (Daniel Smith watercolors), 01 and 05 Micron pens, and a small round for a few areas.


Thursday, May 31, 2018

Testing Watercolor Papers

Recently I ordered sheets of Fabriano Artistico Soft, Strathmore 500, and Stonehenge Aqua to do some experimenting for future handmade journals.

I've learned that Fabriano Artistico Cold Press has changed and my feelings for it have changed as well.  It used to be my #1 favorite.  Now I'm trying to find another paper that comes close to the characteristics I loved about the FA Cold Press of years ago.

Here are examples of my playing.  Way too soon to say a whole lot about the papers and my feelings.

Strathmore 500 Series 140lb:


Fabriano Artistico Soft 140lb (haven't worked too much with this paper yet......more to come)


Wednesday, March 28, 2018

Fabriano Venezia Watercolor Play

This morning I've been playing with watercolor in the Fabriano Venezia sketchbook to see how it handles how I like to work.......wet in wet and mixing color on paper.

Although the paper handles fairly wet applications just fine, it does dry slightly buckled on the back side of the paper and does not allow mixing color on paper very well.  This may be one sketchbook I only paint on one side of the paper because of how I apply washes.  I still need to play more before deciding.

This is comparing palms painted between Fabriano Uno (which I understand is no longer manufactured) and the Venezia sketchbook drawing paper.  Without the sizing I'm used to, it made mixing on surface difficult because the pigment is grabbed into the paper as soon as you lay it down.  The paper may stay wet for awhile but that doesn't appear to make much difference.  I also tried bruising lines and that didn't work either.  I figure if I really applied pressure, the wet paper would tear.

Uno watercolor paper with sizing - mixing color on paper painting wet in wet and bruising lines ....


Fabriano Venezia sketchbook - attempting to mix color on paper and inability to bruise lines....


I still like the paper but will take my working differently.  If I remember right, the handbook paper is similar and I like those sketchbooks as well.  I'll have to try the handbook again to know for sure as it's been awhile.

Tuesday, March 27, 2018

Testing a New Sketchbook - Fabriano Venezia Drawing Sketchbook

A very dear friend here where I live uses this brand sketchbook........Fabriano Venezia Drawing Sketchbook.  Last week I accompanied him on a presentation given in Stonecrest about keeping Artist Journals and as a gift for doing so, he gave me one...........6 x 9" size.

Lee is one who jumps in with pen......using a Sharpie Fine pen and then applying watercolor to his sketch.  Normally I don't dedicate my sketchbooks to anything in particular but this one I want to use his method..........meaning no pencil allowed.  We'll see how that goes.............lol

To start off the first couple of pages, I decided to test different pens on the paper surface.  This lets me know if I need to take care with ink bleeding or bleed through to the back of the page.  I was particularly interested in seeing how my extra fine nibs handled being moved across the paper surface which has a very slight tooth.  And with it being 90 lb "drawing" paper, I wanted to see how it handled my application of watercolor.  For these examples I used only a light wash wet on dry.

The only "drag" I noticed was with the 005 Micron.  My EF fountain pen nibs seemed to move across the paper without any problem.

As noted in my page notes, fountain pen ink tends to spread or feather with the wetter feeding nibs more so than the dryer feeding nibs.  I would have to keep that in mind not allowing my nib to linger in one spot for any length of time but instead moving quickly.  The only bleed through I experienced was when I did the "dot" test letting the tip of the nib just sit for several seconds to see if the dot grew larger.  That showed up on the back side but the thicker nibs with heavier application moving along quickly did not.

First impression..........I like the paper!  I like the texture or slight tooth.  :-)


Sunday, March 25, 2018

Today's Practice - More with Basic Shapes

Trying the basic shapes with people to see if it helps speeding up a bit.  Way too soon to tell.  If I were doing this on paper, I'd work the general shapes lightly in pencil and then ink to define everything.  Right now I'm working in Procreate using layers.  This way I can save each step to look back on as I continue my practice.

This is from our trip out to Wekiva Island for the Paint Out our group went to Saturday a week ago.

Actually it's more like basic shapes and stick people.


Saturday, March 24, 2018

Working with Shapes

Working with general shapes is not how I ever learned to draw.  Instead I've always just picked a spot and followed the overall shape of the subject.

Many times I struggle in seeing those individual shapes and it's probably just because I didn't learn that way.  Now and then I like to try working exercises like this.....hoping it might make things a bit easier or an alternative method in seeing.

With this exercise, my main model is the bottom left bird on this sheet.  Following the same method I normally follow (working from a starting point and following overall shape of the bird, I repeated (bottom right).  Then I worked the exercise breaking down with general shapes to see how it would turn out compared to the model.   All three look slightly different from one another.


Friday, March 16, 2018

Portrait of Hany's Friend, Marianne - Using the Grid Method

A very dear friend who shares with me his art, his experience, and mentors me with my own efforts shared a sketch he worked of another of his dear friends by the name of Marianne.

With my practicing faces, I wanted to see if I could come close to capturing this beautiful young lady.

Hoping to come close to likeness, I chose to use the grid method.  Even with that, I have learned it's not just getting down the contour lines correctly but shading makes all the difference in the world for capturing likeness.

I'm still off but think I came close.  And with kind permission by both Hany and Marianne, I am sharing my experience/steps with you.


Wednesday, March 8, 2017

Sketching People Challenge

Day before yesterday started a social networking challenge called OneWeek100People2017 challenge.  One week being five days and not seven.  

I know me with most challenges so I decided not to participate.  But then several people asked if I was going to join in.  One day I'd think, NO and then the next day I'd think, YES.  I just kept going back and forth so when Monday rolled around, I was on the YES and began this challenge.

Two days in and I was done with wanting to sketch people.  In fact I woke up this morning hoping I'd feel refreshed jumping in to work more and just looking at the sketchbook and pen sitting on my desk just wasn't appealing in any way.  So I've decided not to force myself to do something I'm truly not enjoying at this point.  Repetition of a single subject just isn't for me (unless within reason).  This is why anyone following my blog will see I jump around with subject all the time.  

I'm one who prefers to sketch what jumps out at me at any moment's notice.  Trying to force myself to do something that's not calling my name just ends up leaving me feeling frustrated and less than enthusiastic about sketching or painting.

But here are three more pages I worked yesterday giving me a total of 50 people in two days.  I at least gave it a try but I'm done with people............at least for the time being.  It will have to be on my own terms.........when I feel like practicing people.

Generic Sketchbook