Showing posts with label review. Show all posts

Tuesday, October 16, 2018

Zebra F402 and F301 Ballpoint Pens

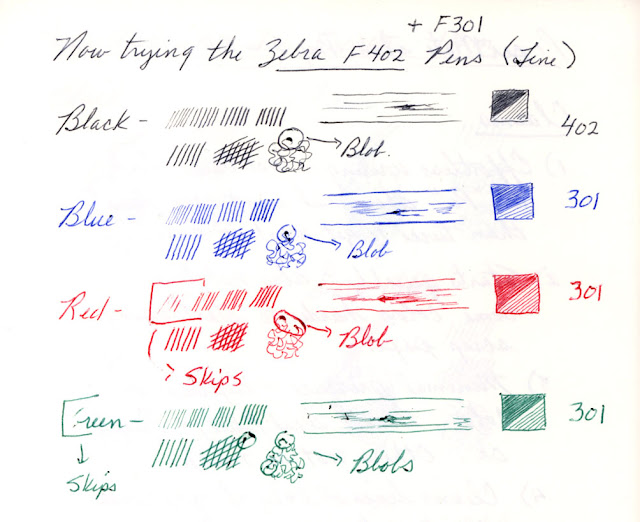
Tucked away in a drawer, I found these Zebra pens and thought I would check them out in two of the journals the Ink Joys did so poorly in.


Fabriano Venezia:

I would prefer a medium point for sketching but these fine points didn't do too badly!

I find the fine points take a bit more pressure to achieve the darker marks I need but I was able to get nice light to dark values similar to those I could get with the PaperMate Stick ballpoint pen (just takes longer and more strokes due to the fine lines).

The transition or blending of light to dark appears smooth.....not choppy and inconsistent like I found with the Ink Joy pens.

There can be slight skipping but not too bad.  At this point I'm not sure if the skipping and extra pressure is to be expected all the time or if because these pens have sat for a very long time possibly contributing to that.  I honestly wouldn't know unless I bought fresh new refills.

As for blobs, they happen but occasionally wiping the points on a paper towel helps keep them at a minimum.  Plus with a finer point, the blobs are smaller.

I would definitely use these for sketching.


UPDATE: after original blog post.  Worked an acorn with the F402 (black) and it definitely compares with the PaperMate Stick pen :-D


Handbook:

I tested these pens in the Handbook before I tried in the Venezia sketchbook.

With this paper, the pens only did OK.  With the fine points and paper texture, there was a bit more skipping and several ink blobs.  However, I did NOT wipe the pen points at any time like I occasionally did when sketching the knots in the Venezia sketchbook.

Even though I had a little trouble on this paper, I can work with these pens for sketching.  However, these would not be my first choice........not in this sketchbook.

Monday, October 15, 2018

PaperMate Ink Joy 500 RT Pens - Part 2

Rather than just testing on one other paper surface, I did so on two as mentioned below.  I really was hoping to find it was just the paper in the Handbook that brought out any flaws these pens might have.  Unfortunately, I found it's not just the Handbook.

This first is using Fabriano Venezia Drawing Journal Book.  The paper is a bit smoother than the Handbook.

Although the pens behaved a little better on this paper surface, I'm still not impressed and would not recommend for sketching on similar paper surfaces.  In fact, I wouldn't want to write with them either on similar papers.

Some of the color inks didn't do well with light to normal pressure.  I had to put more pressure to get my marks and some skipped.  My hand quickly felt fatigued because of the added pressure I had to use just for these simple test marks.

Several colors resulted in pooled ink blobs.  As noted on the page, I wiped the tip/point only once at the very beginning as I wanted to see how bad the ink would pool up (see closeup).


Closeup to problem areas:


This next test is using the PaperBlanks brand journal with unlined writing paper.  The surface is slick.

I found I could make marks with less pressure and no skipping.  Definitely more consistent compared to the other two papers I've tried these on.

Only slight ink blobbing and this time I didn't even wipe the tips/points.

If I used the PaperBlanks journal for sketching, it wouldn't be too frustrating.  The problem is the paper is thin and not meant to take wet media.  If just working pen and ink.........I MIGHT actually sketch with these pens.


Final thoughts...........These pens will probably end up in the bottom of a drawer seldom to never seeing the light of day...........lol

PaperMate Ink Joy 500 RT Pens - Part 1

After the good results I've had with the PaperMate stick pen I have, I purchased a package of Ink Joy 500 RTs in various colors as recommended by another sketcher and other reviews.


My testing was immediately after opening the package and removing the little bead the company puts on the points to keep them fresh.

For Part 1, I am using the Global Arts Handbook, which I've had good luck with the standard stick pen (by same company).


Initial feelings with Ink Joy 500 RT - DISAPPOINTED

1)  I had to scribble on paper now and then just to get the pen to make a mark on paper (even after they had been making marks on paper).  Sometimes I had to go over lines or marks several times before I could even get a mark to show.  This was more of a problem with the other than normal Blues, Blacks, and Reds; but, even my black pen gave me trouble.  (The right page in the heading shows I had trouble with the Black pen.)

Is it pen or paper?  That remains to be seen after I experiment on other paper.  (Part 2).

2)  I could not get a nice even hatching and couldn't transition from light to dark very easily.....not like I can with the stick pen shown above.

Example:   This shows how nicely I was able to hatch and transition from lighter to darker values without much effort..........almost like using a graphite pencil..........using the cheap PaperMate stick pen.  See the wood behind the foreground jug.

I was trying to achieve the same type of marks with the Ink Joys.  There was no way because the ink flow was inconsistent with some of the pens having to use a heavy pressure just to make a mark.

Note:  The Ink Joys AND the stick pen are the same point size......... 1.0 m


3)  These pens end up with a buildup of ink on the point easily and quickly.  I had to wipe the point often, which I find to be a pain.  If a blob ended up on the paper (which it did several times even wiping often), it could smear if not careful.  I only had to do that once in awhile with the stick pen and that was with heavy sketching as I did as shown above.


Close-up of some of the problem areas:


I rely on reviews before I spend money on anything.  I take time to read what people say.....especially the negative reviews.  At the same time, I know that what works for one person may not work for another.  Best to try yourself with the papers you use to see just how something might work.  Only problem.........you have to spend the money to find out :-(   I found the same problem with the Bic Crystal pens everyone raved about and I didn't much care for mainly because of the blobs.  Some ballpoints are worse than others with this issue.

We'll see how I feel when I try other papers.  To be Continued..................


Thursday, June 29, 2017

Always Test Company Claims - Uniball Pens

One of the things I've learned the hard way is to test the claims companies make about their pens / inks being water resistance or waterproof.

Perfect example is the Uniball Vision Elite roller pens saying the ink is water resistant.  Well with that term I would pretty much count on some bleed.  Only one color of the five I have stood up ok to a quick swish of water applied.  See left page.

The Uniball Vision Needle is what really gets me.  Right on the barrel of each pen is stamped WaterPROOF.  Now tell me...........what does the example below on the right page say to you?

ALWAYS test your pens and inks on papers you normally use before doing any serious work......especially if you plan to use washes with your ink drawings.

On a positive note.........these pens would be ok if after a wash effect........except maybe the red pigments?


Tuesday, January 17, 2017

Legion's Stonehenge Aqua CP - One Side Complete

So far I have finished one side of this sampler paper.  And I think it's the back side of the paper if going by the label that is on the corner of the sheet.

Some papers there is a definite difference between front and back in not only feel of the tooth but the look as well.  This paper not so much.....at least not a great deal of difference visually (to my eyes, that is).  Will see how it goes with the difference in usage of back versus front sides.

Here's what I have done so far using watercolor, watercolor pencils, graphite (super thin mechanical pencil lead), and pen and ink using the Platinum Carbon EF desk pen with Lexington Gray ink.

I'm sincerely impressed with the paper and would consider buying it for making hand sewn journals.  Before now I would only consider using Fabriano Artistico watercolor paper.


Saturday, January 14, 2017

New Line of Paper - Stonehenge Aqua

A few weeks ago I received a sampler package of Legion Stonehenge Aqua paper.  In the sampler pack was a sheet of 300 lb CP, 140 lb CP, and 140 lb HP watercolor paper.

Taking the 140 lb CP, I folded and cut into a small accordion journal to see how it handled being folded.  Unlike Arches which cracks at the folds, this paper seemed to handle it well.  How long it holds up to being folded and unfolded remains to be seen.


With this little journal, I've decided to dedicate it to practicing sketching people as I learn how the paper handles different mediums.

With this couple, I first used an 0.3 mm mechanical pencil to test how a very thin lead worked on the paper surface.  It didn't do bad and no breakage of the lead.

Next I used my extra fine fountain pen, Platinum Carbon desk pen to see if the nib hung in the paper fibers.  That too handled well even with nib held upside down for thinner line applications.

Final was the watercolor (DS) and I liked how it went down, blended, and lifted.

Note:  As I experiment with this paper, I am mentally comparing with my favorite - Fabriano Artistico.

First impression............Not Bad :-)

First two folded pages scanned:


Saturday, October 29, 2016

Sailor Fude 55 Degree Angle Bent Nib vs Hero 578 Fountain Pens

Although I'm still waiting on the Sailor Fude 40 degree angle bent nib pen, I thought I would share my own personal findings and feelings between the Sailor Fude 55 and the Hero 578 pens I have.

First off, I love the Hero 578.  Have from day one; however, it's made of metal and can start feeling heavy in the hand after a period of time.  Sometimes my hand will start aching.

The Sailor Fude pens are plastic and much lighter.  They are also longer offering the advantage of carrying an extra cartridge right inside the barrel as backup.


NIB:  The metal piece on top that you apply to paper to make your marks.
FEED:  The plastic "gilled" piece directly under the nib that ink feeds through.

Looking at the Hero nib, I'm estimating it might be about a 40 degree angle.  Will be interesting to compare it to the 40 degree Sailor once it gets here.

I find holding the Hero at proper angles is much easier.  Just seems more natural to the way I would normally hold a pen.

The Sailor Fude I have to keep adjusting my hand and the angle I'm holding the pen to make any marks.  That can be a bit frustrating but I'm sure after a period of time, one could get used to that and it become easier.  Just doesn't seem to take the same effort with the Hero.

As you are looking at the nibs and feeds, notice the distance between the edge of the feed and the bend in the nib.


Not sure you can read the small print on the photo easily so I'll share here as well.

The Sailor Fude's nib bends right at the edge of the feed.  When applying pressure on paper, the edge of the feed can sometimes make marks as well as the nib on the paper giving a double line especially if you hold the nib horizontal  (barrel and pen held horizontal) to achieve it's thickest line mark.

The Hero's bend is further away not causing the same problem.

The plus (or minus depending upon individual and what they prefer) to the 55 degree angle nib is it creates a slightly wider line held horizontal than the Hero nib.  Will probably find the same thing with the 55 degree Sailor versus it's 40 degree sister.


The Hero has a longer (and a little fancier) nib but not sure if or how that would make much difference in anything.

The other thing the Hero has the Sailor doesn't........at the very tip of the nib is tiny bead shape.   I'm sure there's a reason some do or don't have that, but at this point, I don't know what that reason might be.

UPDATE:  Thanks to a good friend, Larry Marshall, I learned what that hard bead of metal is all about on some nib tips.  It's called "tipping" and used to make the rounded nib stronger lasting longer and writing smoother.  Straight edge nibs may not have this beaded tipping (like calligraphy pen nibs) but another art friend showed a music nib with the tipping (that has a straight nib tip).


So between the two pens, I like the Hero best.  It's just a nicer pen all the way around.  A bit heavy but smooth to work with sketching on paper with few problems.  And the angle of the nib is just better for how I hold my pens making it easier to adjust for line widths.

The Sailor is a good pen as well once you get used to how to hold it and taking care the edge of the feed doesn't hit the paper as you use it.  It's lighter which is a plus.  I'd take it out sketching on location before I would the Hero simply because:

#1 - I wouldn't want to lose my Hero pen
#2 - The Sailor is lighter which makes my gear lighter
#3 - You can carry an extra cartridge right inside the barrel
#4 - If you lose the pen, it's not that expensive to replace

Note:  Although you can get a converter for the Sailor in order to load your own ink and save on cartridges, a lot of people complain the ink capacity is not the greatest.  Also, the ink that comes in those cartridges are water soluble so not a good choice if you plan to take watercolor to your ink sketches.

Now for the arrival of the Sailor Fude 40 degree nib.  Will share another comparison once I've had a chance to try it out :-)

Friday, April 29, 2016

Koh-I-Noor Artists' Drawing Pencil Lead 5.6 mm

Received this set of 5.6 mm lead for my clutch pencil yesterday.  Although purchased through Amazon, it came from the United Kingdom.  I was pleased at the speed in which it came too considering where it was coming from.  I had placed my order on April 17th with an estimated delivery date of May 12-26th; however, I received it yesterday April 28th.

Koh-I-Noor Artists' Drawing Pencils


The last set of 2 mm colored lead I received days ago were waxy color pencil like lead.  These here are more chalky and what I was hoping for.

Here is a quick chart I did last night.  The one thing lacking on this chart is testing how well they erase.  One will definitely have to use a fixative to keep these from smearing but love the blending quality.

The Charcoal is super dark and I had a problem being able to achieve a nice value scale.  Would definitely save that for when I needed a real dark area applied and using the Gray for the other values.

The White I also struggled achieving a good value scale but I think that was from operator malfunction ...... not what the lead itself will do ;-)  I did find when using a tortillon that more rubbed off than actually blended.  I need to work with that a bit more to see if that's just the nature of the white or problem with the one using it.


Thursday, April 21, 2016

MEMTEXTs Color Carbon Leads 2mm / 2B

I'm such a sucker for art supplies buying new things to try out.  Yesterday I received an order of the MEMTEXTs Color Carbon Leads for a 2mm Mechanical Pencil.  These color leads are 2B.

On Amazon it's stated these are best used for Adult Coloring Books, which may very well be the case.  The paper that makes up these coloring books may have a toothier paper surface the lead adheres to better than, let's say, smooth like I tested.  I wouldn't know because I don't have a coloring book to try these out on.

One review that stood out to me was the fact they are light in color value and was not satisfactory to that person.  I don't recall if that individual shared what paper they tried their pencil leads on.

Being the person I am......curious and liking to experiment, I purchased a set.

That person is indeed right, although you can go dark if enough force is applied when laying down color.  That would quickly become cumbersome though, I'm sure, for most people.

This little example was done in a PaperBlank's journal which has a slick/smooth paper surface.
I've included on the example my own thoughts and personal findings.  Personally they are nothing more than colored pencils in a format to fit a mechanical pencil.  Great for making up a small sketch kit without having to take a tin of regular sized color pencils; BUT, definitely too much work would have to go into obtaining darker values for my liking.


I've been on the hunt for tinted "graphite" that behaves like regular graphite one can smudge and blend with a tortillion or paper stump.  These definitely do not fit that bill.

I have a set of Koh-I-Noor Gioconda 5.6mm Artists Drawing leads on order and can't wait to try them out.  They come in a set of six (browns/sepias, black, and white).  Will share my findings once I've received and had a chance to try them out :-)


Tuesday, April 12, 2016

The Nomad Artist Satchel

I've held off writing about this only because I've tried very hard to like it and say all good things about it.  Unfortunately, it is not going to work for me.

When the first kickstarter came out selling this satchel, I was interested but wanted to wait until others had actually tried it.  Plus at the time it was a bit pricey for our financial situation.

A friend in one of my groups had purchased from the first kickstarter and decided it wasn't for her and offered to sell it to me.  Although interested, again bad timing.

At a later time, I had my name added to a mailing list showing interest should the Nomad be offered again and missed out on a limited supply that remained after the first kickstarter.

Then last year orders were being taken by those who were interested in pre-ordering a second production and I decided to go ahead and purchase even though the price had gone up.  The gentleman selling these Nomads was super good at keeping us all informed with updates on every step of preparation and production until months later they were finished and shipped out.

The concept is wonderful and if you really would like to know more about it, this link to their site would better explain it.  What I found to be a problem might not be for other folks.


And here is one of several videos showing the Nomad and what you can carry in it and how you use it.


My personal findings:

1)  The satchel appears to be made with good materials and craftsmanship minus an issue I found with mine I'll explain later.

2)  I find for me the satchel to be a bit on the heavy side even without anything added to it.  I can't even imagine the weight once it's loaded with materials I'd like to put in it.  But in all fairness, what might be heavy for one person may not be to another.

3)  Personally, I would have liked it better if a little roomier inside.  Even without anything in it, it's "full" just with the inserts.  Once art supplies are added, along with a paper sketchpad, it bulges.  So much so that I wouldn't want to take a chance adding an ipad to the outside padded pocket that is shown on site and/or in the video.  I would also worry about extended stress on the outer zipper over time and whether it would hold up or not.

4)  There are two inserts that have these bands (one on either side of the case...one with vertical bands and one with horizontal bands......that velcro to the inside front and back covers.  One side has the zippered netting that helps keep supplies in place.  Major problem with mine is the fact these inserts are cut too close to the overall size of the satchel making it difficult to zip closed.  The banded insert on the side of the zippered netting is too large for the area and to make it fit causes the center to buckle (won't lay flat).  Even then, I struggle zipping the netting without catching the edge of the insert.

Because of this buckling, anything I place on that side is going to be pushed into the other side where the sketch pad is.  To me that might present a problem marring the pad with dents or impressions, etc.  No way could I consider putting a thicker journal or sketchbook (which I would prefer over a sketch pad).

Not sure if all are like this or if only a few.  Maybe this second order production is different from the first because pictures I saw showed the inserts that hold the sketch pad and supplies to be smaller than the overall case.

5)  I love the fact it has the tripod adapter plate and I love the idea of the sling making it into a portable table.  Unfortunately the most important aspect of any satchel is being able to take the materials needed when out sketching on location and for me it's not going to work with the satchel I received.


This photo is one angle showing the bow or buckle with the insert in place.

Second photo with it laying flat on the table surface and how it bows.


Shows just how close the insert fits compared to the overall size of the satchel and zipper.


Conclusion:

I'm actually sorry I spent the money for this.  Great concept but............falls short for what I need and to my liking.

I actually prefer the Darsie Field Bag over this and it's less expensive.


New Brush Set by MyArtscape

Always looking for new travel sketching toys, I came across this brush set on Amazon, manufactured by MyArtscape (aka Pegasus Guild).

What I liked about this set are the ultra short brush handles and the nice travel case they come in.  The brushes themselves are about 5 3/4" from tip of brush to bottom of handle.

Click on each picture and you can see a larger image.......


Upon receipt of this set, I discovered one little issue and that was the ferrules on five out of the seven brushes felt loose and "rocked" a bit on the handles.  Initially I was rather disappointed but it's an easy fix adding a bit of glue to secure those loose ferrules and the brush hairs really appear to be of a good quality.............and honestly speaking, the price is very reasonable.

With the discovery of the loose ferrules, I submitted a review on Amazon about my disappointment and to my surprise I received a response (soon after the review went live) on Amazon as well as an email from the manufacturer reaching out to me about what I had written about.

MyArtscape's customer service is superb!  It's not every day a company writes to the customer.........normally it's the other way around when a problem arises.  Quality control and customer satisfaction is very important to this company and I find that to be an extreme positive attribute!  They were quick to want to make things right for me and said their production and quality of these brushes would be followed up on.

One of the biggest pluses (to me) with this set is the case itself....especially the size.  Because I'm always looking for new ideas for small sketching travel kits, it took no time to come up with this idea.

One can lay a small moleskine watercolor sketchbook inside between brush area and the flap that folds over and closes with the magnetic closure (which I love).  Close that up and then slide a thin watercolor palette (in my case a converted NeoColor II tin) and pull the string tight to secure the palette in place.  Perfect little glove box or grab and go sketching kit.

As for the brushes, one might find they prefer to carry other sketching tools in addition to a couple or instead of the brushes that come with the set.  In my case, I chose to include the small flat and liner brush that came with the set and replaced the other brushes with tortillion, Micron pen, Waterbrush, Platinum Carbon Pen (cut down to size), and mechanical pencil.

Am I happy with my purchase???  YES, I am!  I even made a few marks on paper with each of the brushes and liked my initial feel of how they performed.  The flats have nice flat and crisp edges and the rounds are nicely pointed.  Of course I'll know more after I've used them a few to several times if they maintain the nice edges and points.  :-)

Note:  The set includes a 1/2" rake brush (believe that's what it's called).


Example page worked in the Strathmore Watercolor Journal.


Saturday, October 4, 2014

Earnest Ward - Artist - New Ebook

One of my favorite artists who enjoys capturing many of the same subjects as I do as well as keeping a journal recently launched a new ebook called "The North Cascades: Tale of Two Seasons (Spring)," through the Apple Itunes store.

This morning I finished reading this beautiful Artist Journal and adventure ibook by Earnest who’s a naturalist and an artist who loves to observe and record the wonders he encounters in his daily life.

This particular book focuses on his trip to Stehekin......a very remote area of the North Cascades National Park, located in Washington.

As the reader, you accompany Earnest on his daily adventures as the ice and snow begins to melt and the world around awakens with the warming of Spring weather.  You get to experience these wonders via his wonderful illustrations, photos, video clips and descriptive commentary of his encounters; which includes wildlife, flora, means of transportation, people, buildings, and the surrounding landscape.

What I really enjoyed was the variety of mediums used in his illustrations.  Something to tickle the fancy of all artists regardless of their personal preference in medium (graphite, pen and ink, watercolor, acrylic, and oil.)

The other aspect of this book I really enjoyed was his choice in going with the ibook format.  I love the interactive nature of these enhanced ebooks which is a far cry from a standard page by page flip ebook.  From scrolling sidebars of photos and descriptions/observations, to the enhanced illustrations and photos one can view full screen, to the wonderful videos that leave you feeling like you are standing right there experiencing the moment in sight and sound.


This adventure was truly entertaining, informative, and visually pleasing.  A fantastic example of what one can do keeping an artist’s journal and sharing the world and experiences with others.

I hope others will check this gentleman and his ebook out as I believe you'll enjoy the experience as I have.   Here are a several links you might enjoy viewing:

Earnest Ward - Drawn to Life Blog

Earnest Ward Web Site

Earnest Ward Photos - Flickr

Earnest Ward Facebook