Showing posts with label displaying. Show all posts

Thursday, January 20, 2022

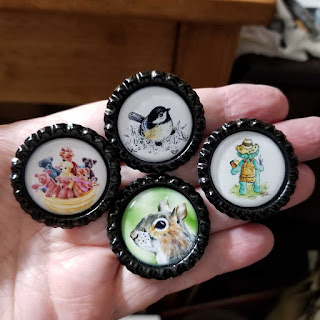
Bottle Cap Magnets Using Art Prints

As a change of pace, I've been working on bottlecap magnets.  These are a blast to make and easy with the supplies I chose to use with epoxy adhesive domes and adhesive seals instead of glues and resin.  Less mess.......no glue, don't have to seal the prints first, and no long drying times.  So far I have made 33.


Friday, April 23, 2021

Art Journaling with a Purpose

I read today where someone was asking for advice dealing with creative blocks.  We all go through them and one way I've managed to work through those times is to view it in a positive by rethinking as "Recharge Periods."  Not so negative which can make us feel worse when those times hit.  Sometimes we just need a break and that's OK.

However, sometimes we develop negative thoughts in general and one of the biggest culprits in my hitting slumps or blocks has happened when this negative voice inside my head starts asking "why do I bother sketching and painting or what purpose does this have when all I do is work in sketchbooks or Ipad tucked away out of sight"?   Many teach, sell their work, or write books on what they do.  Their artwork has a purpose.  I'm not into any of these things except maybe sharing steps that might help another viewer from time to time.

My work has always been therapeutic and that was enough for the longest time.  Then over the last two years I found myself questioning this reason as being enough.  I struggled for months with that which only dampened my desire to do anything.  That's when I started working out creative ways to bring my work OUTSIDE the closed journals lining my bookshelf or hidden inside the Ipad as gifts and unique ways of displaying for myself and family here at home.

So when that negative voice tries to bring that question up again, it's time to squash it by stepping away from sketching and painting and doing something creative with what's already been done.

One of my favorite ways is by creating ATC size prints I can exchange with people or place in 2.5 x 3.5 magnetic photo sleeves for personal use and gifts to family members.

Last night and today I spent my time working on new ATCs to print since the last batch printed early 2020.  I place these throughout the house using file cabinets and refrigerator/freezers as art displays.  It adds a little something special to otherwise plain looking appliances and office furniture. 


Sunday, March 21, 2021

Maternal Family History

Over the last few years, I have worked portrait sketches of each of my sons and my two granddaughters.  I even worked a self portrait that actually turned out OK (I've worked a few over time).

Today I decided to put them together to print off and put into an acrylic photo display.

I printed off on two different papers, one of which was very textured.  The other is matte presentation paper.  Also tried different printer settings with the textured paper on 720 px / High Quality / Premium Presentation Paper and on the actual matte presentation paper I used 720 px / Standard Quality / Premium Presentation Paper.  (I find the high quality to be too much ink on the presentation paper.)   I like the results of each for different reasons but think I prefer the smoothness on  the presentation paper for people.  The texture would look great for other subjects.

Presentation Paper:


Textured Art Print Paper:


Friday, March 5, 2021

A Different Way to Display Prints

Today I received these free-standing acrylic blocks that display two images (front and back).  They hold the photos in place by these strong miniature magnets in each of the four corners.  I wasn't sure if they would be strong enough to hold two back to back images printed off on thick artist paper but they held beautifully.

I love the quality of these.  No scratches and they come with a small microfiber cloth for finger prints.  An alternative to the expensive tiles I've been ordering through Shutterfly.

One I plan to give to my youngest son of his dog, Lola.....as a young pup and one I worked more recent.  The other is of my middle son's cat, Kiddo, and our little dog, Miya. 


Tuesday, January 28, 2020

Another Miniature Project - Wood Tiles

Today I spent a little time covering more charm size prints with resin.  While those set, I started another project where I glue prints on 2 1/4" x 1 1/5" wood tiles (also have 1 1/2" square wood tiles I'm working on.)  Once glue sets, I'm brushing mod podge over each piece.

I like the fact they will stand on their own or you can add magnets to the back.  I might try eye hooks for hanging if I can find the hooks small enough to work in the sides without splitting the wood.  All sorts of ideas are whirling around in my head in which I can display these.


Thursday, January 23, 2020

Think I Prefer to Seal and Glue

Today I am trying an alternative to sealing my mini prints and gluing to glass and bezel trays......2-sided Sticky Sheets.  My initial thoughts based on my first experience:

Pros: 

1)  No need to seal prints

2)  No messing with glue

3)  Crystal Clear - no yellow tone (at least at this point)

Cons:  

1)  A real pain pulling the thin coverings protecting the sticky tape.  It's extremely difficult getting started.

2)  No wiggle room trying to line up with glass or print and if not careful will grab the print if you're not holding one corner of it.  The tape is so sticky that even if a very small corner or edge grabs what you want to stick it to, it is there to stay....no chance to make adjustments or realign.

3)  Even if you're sure your print or glass has no dust on the surface, the tape pulls from the air any particles while in the process of attaching it to surface.

4)  Difficult, even when burnishing, to remove any air bubbles.


At this point, my thoughts are:  I'd rather stick with the time and effort it takes to seal each print and just glue pieces together.  This may change after I have tried a few more times.


With these I'm attaching ribbon where they can hang from the ornament tree off same hooks as the key chains sitting lower.  

*The oval bezels are double sided so I'll be able to put a miniature print front and back.  Nice for this purpose of displaying using the ornament tree.


Thursday, January 16, 2020

Still At It - Resin and Bezel Trays

I can only do so many at a time with all the steps involved and limited space on the tray I have to use to set these up on.

It's a definite and works quite well, sealing with Mod Podge first.  Two coats on the front and two coats on the back allowing drying time between coats.

After waiting at least 24 hours following the last layer of Mod Podge, I pour the resin over the front.  If I plan to place in a bezel tray, I do not flip and repeat on the back.  Not all will go into trays and with those, I will flip and repeat the resin pour and then while set but still pliable, I will drill a hole for a jump ring to be placed.

Resin pour, covering with dust cover, and allowing to set for twelve hours.


Top left - those I have sealed and still need resin.  Top right are still those I need to seal before doing anything else.  Top middle are those with resin I will probably flip and cover in resin for jump rings later.  Far left and far right of the key chains are my test pieces sealed using Matte Fixable Spray (which I will not use again due to how it darkens or changes the color of each piece) or one I didn't seal at all.  Key chains are being used as interchangeable frames for mini art.  For now I am not setting the miniatures permanently in each tray allowing me to change out other miniatures from time to time.


Method of Displaying.


Thursday, January 9, 2020

Photo Key Chain Using Resin

Now this was more or less a success!  The trays can be added to key chains or other type hooks as zipper pulls or charms.

This is using one of the test pieces where I sealed the inkjet print with mod podge and then poured resin over it to create a nice dome.  For now it's just sitting in the tray as I await glue to arrive to put it in permanently.

Because I wasn't sure if I'd place glass over it in the bezel or add a resin dome, I had rounded the corners of the print.  Next time I will probably not round the corners unless I definitely plan to add the glass over the print.

I really like this resin that I purchased from little-windows.com.  It levels beautifully and crystal clear and smooth.  I was fortunate with the domed pieces as none had any bubbles to worry about popping or removing as it set (I must have done something right...lol).  Biggest plus............no odor.


Tuesday, January 7, 2020

Trial and Error with Resin

Another idea I'm working on is printing off tiny charm or jewelry size prints of my illustrations.  Mostly in bezel trays and some without.  I've never worked with resin so this is a work in progress with trial and error.

First try is printing off on Epson Ultra Premium Presentation paper miniature paintings about the size 1" x 1 3/8'  using my Christmas gift from hubby - Epson XP 15000 photo printer.  That's taking some playing as well as I learn what it can do on various papers.  The prints came out beautifully.

Next is using different methods of sealing the prints so that the resin doesn't cause the ink to bleed (to include a test seeing what happens if not sealed).

Two prints I chose to seal with Blair's Matte Fixable spray that I use all the time spraying graphite drawings and watercolor paintings on Aquaboard.  It has always worked great so I thought it would be perfect to seal the inkjet prints.  I notice they are taking on a darker tone.

Three prints I chose to brush on Mod Podge Gloss-Lustre-Lustre with the red label with two coats.  As hard as I tried to get a nice even coating, you could see slight brush streaks even after dry.

The resin I am using is from Little-Windows.com.  I purchased their starter kit to see if it would be something to continue with or go a different route.  Too soon to decide at this point but may be more involved than I care to deal with.

After mixing and pouring the resin over each, it didn't take long to start seeing the effects.

First Time Results:

I will not be using the Blair Fixable Spray as it darkens the paper turning it a buff color.

Those with the Mod Podge remained white and clear.  The brush streaks don't appear to be as noticeable but I'll have a better idea late tonight or tomorrow when I can examine it closely and under good lighting.

And forget skipping the step of sealing the inkjet prints.  The resin caused the ink to bleed giving the piece a pink tone and washed out image.

Mod Podge definitely wins this round.  I want to try Sakura 3D Clear Lacquer once it gets here :-)

Once the 12 hour waiting time is up, I want to repeat the resin on the back of the top three I'm using as experiments and then test out drilling holes at the top for jump rings.   The other three I will probably place in bezel trays I have to make keychains


Monday, January 6, 2020

Working With Previous Sketches and Paintings

One of the things I deal with from time to time is asking myself why I bother doing what I do.  I don't sell, show (well outside of sharing on the internet), or compete, but instead, do this for myself with the main reason being therapeutic in nature.  Sometimes, that reason is just not enough to keep me inspired or motivated.

There ARE times I will take something I've done and have it printed off to hang but I'm not real big on hanging pictures on the wall.  Or, I might upload to Shutterfly for coffee cups, key chains, or standing tiles for family gifts.  Other than that, my artwork resides inside journals sitting on a shelf.....seldom ever taken down to look at.

A dear friend shared what she does with some of her work.........creating gift and note cards.  She also makes photo charms (mini paintings in bezel trays and lacquered over) using hooks along with embellishments like beads, buttons, etc.  She finds ways to enjoy and share her work or display outside her journals.

Because I've been in such a funk with sketching or painting, I have struggled setting goals for 2020.  So in the meantime, I thought I could try and do something with what I've already created.  Maybe that might help inspire me into what I might want to do this year.

Inspired by my friend, I have decided to create note cards and magnets using previous illustrations I have sketched/painted in my journals (or Ipad).  Next I want to try my hand at taking printed miniatures and covering in resin (in or out of bezel trays).  Maybe then I can get past this "why bother" mode I'm stuck in and move forward :-)

This is just a very small sampling of the note cards I have created so far.  They are the size of RSVP or invitation cards.  I can use these for personal use and/or give as gifts.  The paper I am using is Hammermill Color Copy Cover 80lb weight paper.  I can fit two note cards per sheet of paper.  Envelopes and sleeves I found through ClearBags.com.


The magnets are being used to decorate file cabinets and personal size refrigerator/freezers we have.  They are ATC size (2.5 x 3.5") placed in magnetic photo sleeves.  Paper I'm using (for now) is Arches Infinity Museum Quality Digital Art & Photo Inkjet paper.  Unfortunately, it's no longer available, which is a major disappointment as I loved the texture of the paper and what I have always used for art prints.  My understanding is that Canson now sells similar paper but it's just not the same according to forums I've read where other people are in search for an alternative to their beloved Arches Infinity.  Thank goodness I have a couple/few boxes of this paper left.  As for the magnetic photo sleeves...........I used to get packages from Walmart but found others on Amazon I think are a little better quality.


Thursday, January 4, 2018

Art Journaling Using an Ipad

I love journaling because all my artwork is maintained in books one can sit and flip through.  In addition to my books, I take quality scans so that I can have a digital copy for backup and to print from should I want reprints for framing.

So what happens when I work digital sketches and paintings and want to have them in a book format to sit and flip through?

Some people might consider printing off and pasting in an actual journal or sketchbook.  I'm not one for scrap booking which to me means playing with glue.  Instead, I like using what I used to use for safekeeping of all my individual sheet paintings before I took to keeping actual journal books.........Itoya Presentation Portfolio Folders.

You can get these in various sizes and the sleeves you slide your work down into are acid free.  This way not only do I have a book of my digital paintings to flip and view, I also have a hard copy as backup.


Monday, July 18, 2011

What One Family Member Did with My Artwork

How many people do you know would take a painting you did for them and have it tattooed to their body?  Talk about making one feel on top of the world and reinforce what they do as being truly worthy of the time and effort put into their artwork.

This is from a painting of two lilies I did for my sister-in-law - "Sissy"  It's not 100% exact to the painting for obvious reasons due to limitations of detail with tattoos; but, it's close and definitely recognizable and a reminder of the painting I did for her years ago.

Anytime I might be feeling low and question why I bother with all the time and effort drawing and painting (which does happen from time to time)........all I have to do is visit my "Sissy"  What she did has to be the ultimate sign of approval and love for what I do.      :-D

Tuesday, December 7, 2010

Holiday Wishes

Taking one of my winter scenes painted this year, I've used a little creativity and Photoshop to design my 2010 Cyber Christmas Card. 

This was loads of fun to do and shows what we can do with our artwork in addition to matting and framing for wall display.

Happy Holidays, Everyone!!!!

Thursday, August 12, 2010

Ideas for your Artwork

Years ago I used to paint the normal size other people paint for displaying on the wall.  After awhile, I found myself painting smaller and smaller.  Personally I like being different so I try to find unique or different ways of displaying and sharing my work other than the norm.

On average, I paint in the 5 x 7" range.  Sometimes 4 x 6" and sometimes 7 x 10 (mainly several cameos on this size)  It's easier to store this size and I maintain portfolios and/or journal books of all my work.

Here are some ideas other than wall hangings for sharing your artwork that I personally love:

Bookmarks make wonderful gifts.  


Books - These were created using Shutterfly Photo Service.  A Christmas gift idea for family.  Also a great way of putting together reference books for yourself.  I have several step by step tutorials and put the collection together in one of these books as a teaching reference for myself.


ATC size prints can be printed off and displayed as shown.  I watch for specials on Amazon for unique ways of displaying photos and notes that can be applied to miniature paintings.


I especially love this idea - Digital Photo Frame


This is one of my favorites but find it very difficult to find these photo wheels.  At one point I could get these and miniature photo wheels.  Made great gifts for my family!


Other Ideas not shown:

Note Cards - Always a wonderful way of sharing your work.

Magnetic Photo Pockets (I get mine at Walmart either in the 2.5 x 3.5 in size or the 5 x 7 in size)  - My filing cabinet in my office/studio is lined with prints of my paintings.  Great for displaying on refrigerators where family and friends can readily view when visiting.

Photo Brag Book - Instead of using a service like Shutterfly, one can print off their paintings and show off or present as a gift in the form of a brag book or scrap book with embellishments and whatnot.

Place Card Holders - There are many unique and beautiful place card holders one can use to display a single miniature painting.  These can be lined up on a shelf or mantle.

Slide show file (using Mac iphoto as just one means) of digital painting images with music and transitions that can be loaded onto iPhones and probably similar idea for other smart phones.  And for a simpler idea......just upload digital copies of your paintings to your phone for sharing when out and about.

I am sure there are many other ideas out there.  It's only limited to one's imagination in how to present and share with other people.